Are you tired of high electricity bills and want to take control of your energy source? Look no further! In this article, we will guide you through easy steps for DIY solar power installation.
With our expert knowledge, you can assess your energy needs, choose the right solar panels, install and mount them, connect them to the inverter, and test and monitor your solar power system.
Join the community of eco-conscious individuals and start harnessing the power of the sun today!
Key Takeaways
- Calculate daily electricity consumption to determine energy requirements
- Look for high-efficiency and durable solar panels
- Securely mount panels and perform regular maintenance
- Connect panels to the inverter correctly and test the system for proper functioning
Assessing Your Energy Needs
Assess your energy needs by calculating your daily electricity consumption. This step is crucial in evaluating solar power options for your home.
To accurately determine your energy requirements, start by reviewing your utility bills to gather data on your monthly electricity usage. Calculate your average daily consumption by dividing your monthly kilowatt-hour (kWh) usage by the number of days in the billing cycle.
Additionally, consider any appliances or devices that consume a significant amount of electricity, such as air conditioners or electric heaters. Take note of their power ratings and the average number of hours they’re used daily.
Choosing the Right Solar Panels
To ensure the success of your DIY solar power installation, it’s essential to carefully select the most suitable solar panels for your specific energy needs. Here are some key factors to consider when choosing the right solar panels:
- Solar panel efficiency: Look for panels with high efficiency ratings, as this determines how effectively they convert sunlight into electricity. Higher efficiency panels can generate more power with a smaller surface area, making them ideal for installations with limited space.
- Solar panel durability: Consider the durability of the panels, as they’ll be exposed to various weather conditions over their lifespan. Look for panels that are made from high-quality materials and have a strong frame to withstand hail, wind, and other potential damage.
- Manufacturer warranty: Check the warranty offered by the manufacturer. A longer warranty period indicates the manufacturer’s confidence in the quality and durability of their panels.
- Cost: Compare the cost of different solar panels, taking into account their efficiency and durability. Consider the long-term savings and return on investment when making your decision.
- Customer reviews: Read reviews from other customers to get an idea of the performance and reliability of the solar panels you’re considering.
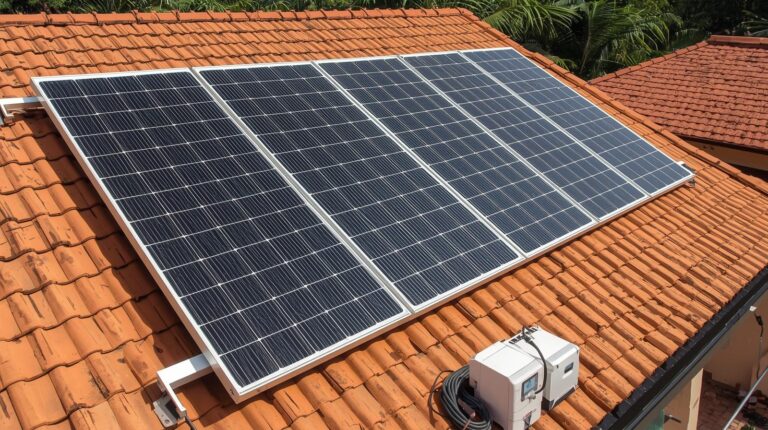
Installing and Mounting Solar Panels
Now that you have chosen the right solar panels, it’s time to move on to the next step: installing and mounting them.
Proper installation and mounting are crucial for the overall performance and longevity of your solar power system. Before starting, ensure that you have all the necessary tools and equipment.
Begin by identifying the ideal location for your panels, considering factors such as sun exposure and shading. Proper placement is crucial for maximizing solar panel efficiency.
Once you’ve determined the location, securely mount the panels on a sturdy surface, such as the roof or ground. Be sure to follow the manufacturer’s instructions carefully.
After installation, regular maintenance and upkeep of your solar panels are essential. This includes cleaning the panels periodically and checking for any damage or debris that may affect their performance.
Connecting the Solar Panels to the Inverter
Next, connect the solar panels to the inverter following the manufacturer’s instructions carefully. This step is crucial for ensuring the efficient conversion of solar energy into usable electricity. Here are some important things to keep in mind when connecting your solar panels to the inverter:
- Position the solar panels properly to maximize their exposure to sunlight and optimize solar panel efficiency.
- Use high-quality cables and connectors to minimize power loss during the transfer of electricity.
- Make sure the positive and negative terminals of the solar panels are correctly connected to the corresponding terminals on the inverter.
- Double-check all connections for tightness and security to prevent any potential issues or damage.
- Test the system after the connection to ensure that the solar panels are generating electricity and that it’s being properly converted by the inverter.
Testing and Monitoring Your Solar Power System
Once the solar panels have been connected to the inverter, it’s essential for you to regularly test and monitor the efficiency of your solar power system. Monitoring the performance of your solar power system ensures that it’s operating optimally and allows you to identify and troubleshoot common issues that may arise.
To test the performance of your system, you can use a solar power monitoring system which provides real-time data on energy production, consumption, and system efficiency. By analyzing this data, you can identify any underperforming panels or potential system faults.
Additionally, it’s important to visually inspect your system regularly to check for any physical damage or obstructions that may be affecting its performance.
Conclusion
Congratulations! You have successfully navigated the intricate world of DIY solar power installation. By assessing your energy needs, selecting the right panels, mounting them with finesse, connecting them to the all-important inverter, and diligently testing and monitoring your system, you have become a solar power pioneer.
Now, sit back and bask in the glory of free, sustainable energy while the rest of the world struggles with their outdated power sources. You’re a shining example of technical prowess and environmental responsibility.
Well done!