I’ll never forget the first time the grid went down during a harsh winter storm, leaving my family in the dark for three days. Food spoiled in the fridge, our phones died, and the cold was relentless. It was that freezing weekend that pushed me to finally stop relying entirely on the utility company and look into renewable energy DIY projects. I immediately researched portable solar power stations online, but the high price tags for the capacity I needed gave me severe sticker shock. Building a DIY solar power generator seemed intimidating at first—I’m not an electrician, after all. But once I broke the system down into its core components, I realized it’s a highly achievable, rewarding project for anyone willing to learn.
In this comprehensive guide, I am going to walk you through exactly how to build a solar generator from scratch. Whether you’re preparing for power outages, outfitting an RV, or exploring solar power for off-grid living, this step-by-step breakdown will save you time, money, and headaches. You’ll learn how to accurately calculate your energy needs, select the right solar battery storage, safely wire everything together, and understand the true solar generator cost. Let’s demystify off-grid energy and get your power independence started.
DIY vs. Pre-Built Solar Generators: A Transparent Cost Breakdown
When I first started my journey into solar power for off-grid living, my primary question was: Is building a DIY solar generator actually cheaper than buying a manufactured unit off the shelf?
The short answer is yes, but with some practical caveats. Manufacturers like EcoFlow, Jackery, and Bluetti make fantastic, ready-to-use portable power stations. They are sleek, boast built-in charge controllers and inverters, and come with manufacturer warranties. However, you pay a significant premium for that convenience.
When you build a system yourself, you get significantly more power capacity (watt-hours) for your dollar. You also gain the ability to repair or upgrade individual components. If a battery dies in a manufactured unit, the whole unit is often effectively bricked. If your DIY battery degrades after a decade, you simply swap it out.
Here is a realistic cost comparison based on current market averages for a mid-sized system capable of outputting 1,000 to 1,500 Watt-hours (Wh) of storage:
| System Type | Average Cost Range | Pros | Cons |
|---|---|---|---|
| DIY Component Build | $400 – $700 | Highest capacity per dollar, individually repairable, highly customizable. | Requires time to assemble, steep initial learning curve, no system-wide warranty. |
| DIY Solar Generator Kit | $600 – $900 | Components are pre-matched by the vendor, easier to source. | Still requires manual assembly, slightly higher cost than sourcing parts independently. |
| Manufactured Portable Power Station | $900 – $1,800+ | Plug-and-play, lightweight, compact, covered by a manufacturer warranty. | Expensive, difficult to repair, uses proprietary parts, limited upgradeability. |
Note: Prices vary by region and supplier. Always shop around for the best deals on individual components, but avoid suspiciously cheap, unbranded electronics.
Calculating Your Energy Needs (The Math Made Simple)
Before you buy a single wire or solar panel, you must determine what you actually want to power. A common, costly mistake I made early on was buying a battery without calculating my daily watt-hour usage, resulting in a system that died halfway through the night.
To size your solar battery storage and inverter correctly, you need to calculate your Watt-hours (Wh) and your peak wattage draw. Let’s look at a simple, practical example.
Step 1: List your devices and their wattage.
Check the power brick or label on your appliances to find their power draw in watts.
- Laptop: 60 watts
- LED Light Bulb: 10 watts
- Mini-fridge: 100 watts (Note: compressor fridges cycle on and off, so they don’t run continuously. We will assume it runs about 8 hours a day).
Step 2: Multiply by your expected hours of use.
- Laptop: 60 watts × 4 hours = 240 Wh
- LED Light Bulb: 10 watts × 5 hours = 50 Wh
- Mini-fridge: 100 watts × 8 hours = 800 Wh
- Total Daily Energy Need = 1,090 Watt-hours (Wh)
Step 3: Size the Battery to Match
If you need 1,090 Wh, you shouldn’t buy exactly a 1,100 Wh battery. Why? Because batteries shouldn’t be drained to absolute zero.
- If you use lead-acid batteries, you should never drain them past 50% depth of discharge (DoD) to avoid destroying their lifespan. So, you would need a 2,200 Wh battery.
- If you use a lithium-ion (LiFePO4) battery, you can safely drain it to about 80-90% DoD. Therefore, a 1,300 Wh lithium battery would easily suffice for your daily needs.
To convert Watt-hours to Amp-hours (Ah) for a standard 12V battery system:
Simply divide your Watt-hours by 12.
(1,300 Wh ÷ 12V = 108 Ah battery. You would round up and purchase a standard 12V 100Ah or 120Ah battery).
Essential Components for Your DIY Solar Generator
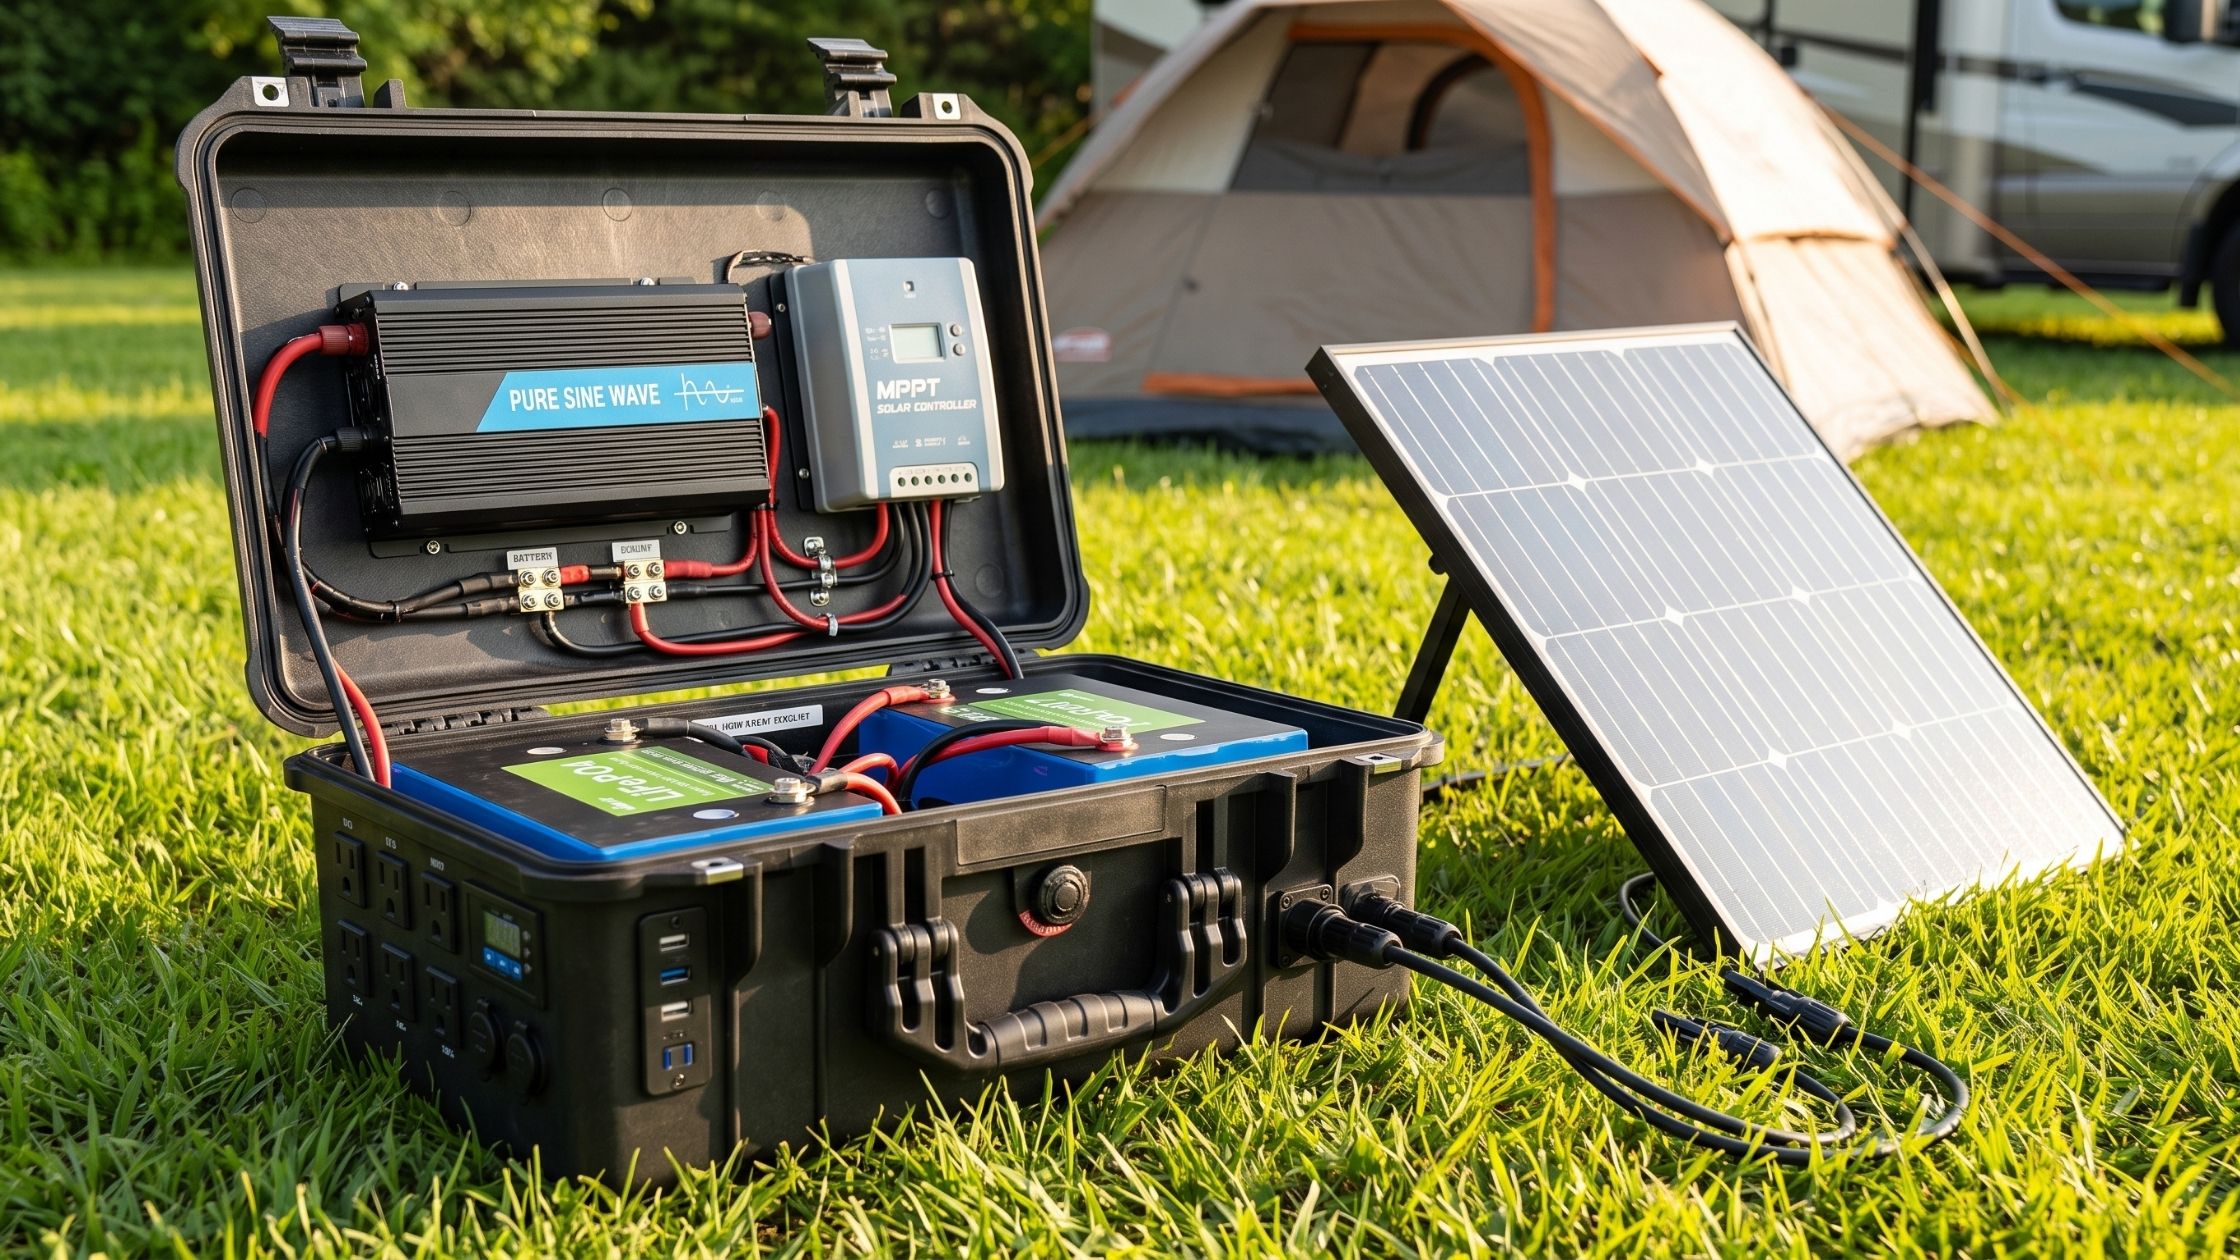
A solar power generator consists of four main functional parts housed in a durable case: solar panels, a charge controller, a battery, and an inverter. Let’s break down each component based on industry standards supported by resources like the U.S. Department of Energy and the National Renewable Energy Laboratory (NREL).
[Image Placeholder: Component layout photo showing a panel, charge controller, battery, and inverter laid out on a wooden workbench. Alt text: Flat lay photograph of DIY solar generator components including a rigid monocrystalline panel, MPPT charge controller, LiFePO4 battery, and pure sine wave inverter.]
Solar Panels: Monocrystalline vs Polycrystalline Solar Panels
Your solar panels collect sunlight and convert it into direct current (DC) electricity. When shopping, you’ll encounter three main types of photovoltaic cells. For almost all DIY solar generator projects, I strongly recommend rigid monocrystalline panels for the best efficiency-to-cost ratio.
| Panel Type | Average Efficiency | Est. Cost per Watt | Pros & Cons | Best Use Case |
|---|---|---|---|---|
| Monocrystalline | 17% – 22% | $0.80 – $1.20 | Pros: Highly efficient, space-saving, performs better in low light. Cons: Slightly more expensive. | Limited space builds where high efficiency is needed. (Highly Recommended) |
| Polycrystalline | 15% – 17% | $0.70 – $1.00 | Pros: Lower upfront cost, eco-friendly manufacturing. Cons: Takes up more physical space, lower efficiency. | Budget builds with ample mounting space, like a large cabin roof. |
| Thin-Film / Flexible | 10% – 13% | $1.50 – $2.00 | Pros: Lightweight, bends to fit contours. Cons: Degrades faster, low efficiency, expensive. | Curved surfaces like RV roofs, camper vans, or marine applications. |
The Solar Battery: Lithium-ion vs Lead-Acid
Your battery is the literal heavyweight and heart of the system. It stores the energy your panels collect for use when the sun isn’t shining. The debate between lithium-ion vs lead-acid battery technology is common, but in recent years, one clear winner has emerged for portable power.
| Battery Chemistry | Depth of Discharge (DoD) | Lifespan (Cycles) | Weight (per 100Ah) | Price Range | Verdict |
|---|---|---|---|---|---|
| Deep-Cycle Lead-Acid (AGM/Gel) | 50% max (draining lower damages the battery) | 300 – 500 cycles (3-5 years) | ~60 – 70 lbs | $150 – $250 | Cheap upfront, but heavy and requires replacement often. Not ideal for portable builds. |
| Lithium-Iron Phosphate (LiFePO4) | 80% – 100% (can be drained deeply without damage) | 3,000 – 5,000+ cycles (10+ years) | ~25 – 30 lbs | $300 – $800+ | Higher initial cost, but significantly lighter, safer, and cheaper over the long term. |
A sub-type of lithium-ion, LiFePO4, is the gold standard for modern DIY builds. Brands like Battle Born Batteries set the premium industry standard, while budget-friendly alternatives have made the technology highly accessible. For a portable DIY solar power generator, always choose lithium. Hauling a 70-pound lead-acid battery in a portable case is a surefire way to ruin your back.
Charge Controller for Solar
The charge controller is the brain of your system. It sits between your solar panels and your battery, regulating the voltage and current so you don’t overcharge, overheat, and ruin your battery.
- PWM (Pulse Width Modulation): These are cheaper (usually $20-$40), but far less efficient. They pull the solar panel voltage down to match the battery voltage, wasting potential energy. They are okay for tiny, basic builds under 100 watts, but generally not recommended for serious setups.
- MPPT (Maximum Power Point Tracking): More expensive ($80-$200+), but up to 30% more efficient. MPPT controllers take excess voltage from the panels and convert it into extra current (amps) for the battery. Reputable brands like Renogy and Victron Energy make excellent MPPT controllers. If you want to capture every ounce of sunlight, an MPPT controller is mandatory.
Power Inverter
Your battery stores 12V DC power, but your standard household appliances run on 120V AC power. The inverter performs this crucial conversion. When shopping for an inverter, always buy a Pure Sine Wave Inverter. You will see cheaper “Modified Sine Wave” inverters on the market. Avoid them. Modified sine waves produce choppy, blocky electrical currents that can permanently damage sensitive electronics like laptops, CPAP machines, medical devices, and modern televisions. Furthermore, anything with a motor (like a fan or fridge compressor) will run hot and loud on a modified sine wave.
Casing, DC Input, and Fuses
To make your system a true “portable generator,” you need a sturdy box to house it. Many DIYers utilize heavy-duty toolboxes, Pelican cases, or even rigid rolling coolers.
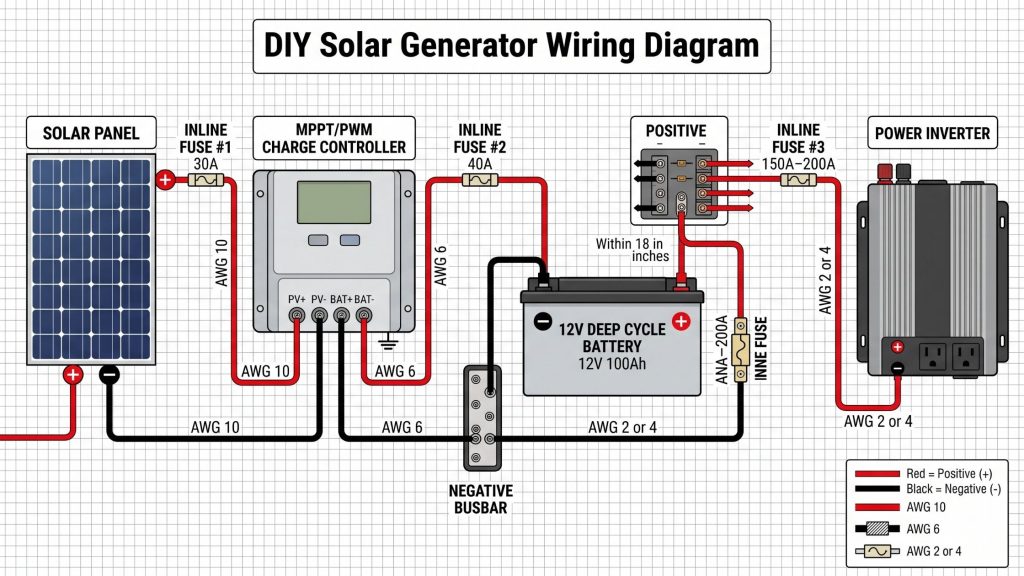
Beyond the box, you will need properly sized wiring. Using wire that is too thin will cause it to overheat and potentially start a fire. You will typically use 10 AWG wire for the solar panel and charge controller connections, and thick 4 AWG or 2 AWG wire to connect the battery to the inverter. Finally, you will need MC4 connectors for the exterior DC input from the solar panels, and most importantly, inline fuses to protect the system.
Crucial Safety Precautions for DIY Solar Projects
Working with electricity—even 12V DC power—carries real, physical risks. A short-circuited battery can melt wires instantly, start fires, or cause severe burns. Keep these mandatory safety rules in mind before you strip a single wire:
- Always Use Fuses: This is non-negotiable. Place an appropriately sized inline fuse between the battery and the inverter, and another between the battery and the charge controller. The fuse should be rated slightly higher than the maximum current you expect to draw, acting as a deliberate weak point that will safely break the circuit if something goes wrong.
- Strict Wiring Sequence (Negative Before Positive): Always connect the battery to the charge controller before connecting the solar panels to the charge controller. Reversing this sequence can permanently fry your charge controller.
- Mind Your Polarity: Always connect negative (black) to negative, and positive (red) to positive. Double-check your connections before turning anything on.
- Ventilation Matters: If you opt for lead-acid batteries to save money, they must be properly vented to the outside of your casing. They release highly explosive hydrogen gas when charging. (This is another reason to use sealed Lithium LiFePO4 batteries, which do not off-gas).
- Avoid Electric Shock: Use tools with rubberized, insulated handles. Remove rings, watches, and dangling metal jewelry when working near battery terminals. A metal wrench dropped across positive and negative battery terminals will instantly weld itself to the metal and cause a dangerous thermal event.
Recommended Tools and Materials Checklist
Before you start assembling, gather all these materials to ensure a smooth, uninterrupted build:
Core Components:
- 12V LiFePO4 Battery (e.g., 50Ah or 100Ah capacity)
- MPPT Charge Controller (20A or 30A rating)
- Pure Sine Wave Inverter (1000W or larger, depending on your calculated needs)
- Monocrystalline Solar Panel (100W or 200W)
- Heavy-duty carrying case (Toolbox, Pelican case, or cooler)
Wiring and Safety:
- 10 AWG copper wire (for solar panels and charge controller)
- 4 AWG or 2 AWG copper wire (for the battery to the inverter)
- MC4 connectors (to create exterior plug-in ports for the solar panels)
- Inline fuses (ANL fuses recommended for the inverter cable, standard blade fuses for the charge controller)
- Ring terminals matched to your wire gauge
Tools:
- Heavy-duty wire crimper
- Wire strippers and cutters
- Digital multimeter (essential for testing voltage and continuity)
- Power drill (for making port holes in your casing)
- Screwdrivers and insulated wrenches
Step-by-Step Installation: How to Build Your Solar Generator
Ready to put it all together? Here is the exact, step-by-step sequence I use when assembling a portable solar power station. Take your time, double-check your wire sizing, and keep your multimeter handy.
Step 1: Prepare the Casing and Layout
Map out where your components will sit inside your toolbox before securing them. You want the heavy battery seated firmly in the center-bottom of the case for balance. Once you have your layout, use a power drill with a hole saw attachment to drill openings in the side of the casing. You will need holes for your AC outlets (to plug things into the inverter), DC inputs (to plug in the solar panels via MC4 connectors), and ventilation fans if your inverter requires extra airflow.
Step 2: Secure the Components
Mount the battery, inverter, and charge controller securely inside the case. If this generator is going to be portable, things will get bumped around. Use industrial Velcro, heavy-duty zip ties, or build custom wooden mounting brackets. Nothing inside the box should shift when you lift or tilt the case.
Step 3: Connect the Battery to the Charge Controller
CRITICAL: This must always be your first electrical connection. Your charge controller needs to register the battery voltage before it can safely accept power from the solar panels.
- Crimp ring terminals onto your red and black 10 AWG wires.
- Install an inline fuse on the positive (red) wire, as close to the battery terminal as possible.
- Connect the negative (black) wire from the negative battery terminal to the negative battery port on the charge controller.
- Connect the positive (red) wire from the positive battery terminal to the positive battery port on the charge controller. The controller’s LCD screen should instantly turn on.
Step 4: Connect the Inverter to the Battery
The inverter draws massive amounts of power, so you must use thick wire (like 4 AWG or 2 AWG) to prevent overheating.
- Install a heavy-duty ANL fuse on the positive (red) inverter cable.
- Connect the negative cable from the inverter to the negative battery terminal.
- Connect the positive cable from the inverter to the positive battery terminal.
Pro Tip: You may see a quick, small spark when connecting the final positive terminal to the inverter. This is entirely normal; it is simply the inverter’s internal capacitors charging up.
Step 5: Connect the DC Inputs for the Solar Panels
Wire your MC4 connectors from the exterior of the casing directly to the PV (Photovoltaic) inputs on the charge controller. Ensure you observe proper polarity (positive to positive, negative to negative).
Step 6: Test the System
Before screwing the lid shut, use your digital multimeter to check the voltage across the battery terminals (a fully charged 12V LiFePO4 battery should read around 13.3V to 13.6V). Next, turn on the inverter and plug in a small test load, like a household lamp, to ensure AC power is flowing correctly. Finally, carry the unit outside, plug your solar panels into the exterior MC4 ports, and verify that the charge controller screen indicates incoming wattage from the sun.
DIY Solar Power Generator: FAQs
How much does it cost to build a DIY solar generator?
A highly functional, mid-sized DIY solar generator featuring a 1000W inverter and a 50Ah lithium battery will generally cost between $400 and $600. A much larger system capable of running power tools or a small refrigerator (e.g., a 2000W inverter and a 100Ah battery) will cost closer to $800 to $1,000 depending on component quality.
What size solar panel do I need for a generator?
As a general rule of thumb, you want enough solar input to fully recharge your battery during 5 to 6 peak sun hours. If you have a 600Wh battery, a 100W solar panel will recharge it in about 6 to 7 hours of ideal, direct sunlight. A 200W panel array is generally the sweet spot for portable builds, offering rapid charging without being too bulky to carry.
What is the difference between a DIY solar generator and a manufactured one?
A manufactured unit (like a Jackery or EcoFlow) is an all-in-one, plug-and-play device safely encased in custom plastic. A DIY generator uses individual, modular, off-the-shelf components. The DIY route is cheaper, easily repairable, and highly customizable, while manufactured units are lighter, more compact, and beginner-friendly, albeit at a premium price.
How long does it take to charge a solar battery?
Charging time depends heavily on your battery’s capacity and your solar panel’s actual wattage output. A basic formula to use is: Battery Capacity (Wh) ÷ Solar Panel Output (Watts) = Hours to charge. For example, a 1000Wh battery connected to 200W of solar panels will take roughly 5 to 6 hours of direct, peak sunlight to fully charge. Keep in mind that clouds and shading will increase this time.
What is the best way to store solar energy?
The most efficient, longest-lasting, and safest way to store solar energy for modern DIY projects is by using Lithium-Iron-Phosphate (LiFePO4) batteries. They are chemically safer than standard lithium-ion, last for thousands of charge cycles, and can be discharged almost completely to zero without sustaining permanent damage.
Can a DIY solar generator run a refrigerator?
Yes, but you must size it correctly. A standard kitchen refrigerator requires a large inverter (at least 2000W) to handle the initial electrical surge when the compressor kicks on. It also requires a substantial battery bank (minimum 200Ah or 2400Wh) to run the fridge overnight when the sun isn’t shining to replenish the power.
Conclusion
Building your own DIY solar power generator is one of the most practical and rewarding renewable energy DIY projects you can undertake. Not only will you save hundreds of dollars compared to buying a manufactured portable solar power station, but you also gain invaluable technical knowledge.
You now understand exactly how to calculate your energy requirements, how a charge controller for solar works, the functional differences between monocrystalline vs polycrystalline solar panels, and why choosing a lithium-ion vs lead-acid battery is so critical to system performance.
If the grid goes down, or if you decide to take a week-long off-grid camping trip, you won’t be left in the dark. You’ll have a reliable, silent, and completely fume-free power source that runs purely on the sun.
About the Author: The author is a renewable energy advocate and off-grid DIY enthusiast with over a decade of hands-on experience designing residential solar systems, portable battery banks, and emergency preparedness kits. When they aren’t testing the latest MPPT charge controllers or reviewing battery cell lifespans, they’re likely camping completely off-grid, powered solely by the sun.