Are you interested in harnessing the power of the sun to generate your own electricity? Look no further than an easy DIY solar panel installation guide.
But where do you start? How do you even begin to navigate the process of installing solar panels on your own?
In this discussion, we will explore the benefits of a DIY installation, the step-by-step instructions involved, and the tools and resources available to help you successfully complete your own solar panel project.
So, if you’re ready to take control of your energy future and save on your electric bill, keep reading for an informative and comprehensive guide to DIY solar panel installation.
Key Takeaways
- Calculating average monthly kilowatt-hour consumption is crucial in determining the size of the solar panel system needed.
- Assessing the property for factors such as available roof space, sun exposure, shading, and structural capability is important for choosing the best installation location.
- Considerations for choosing between buying or leasing solar panels include budget, long-term ownership, potential cost savings, and tax incentives.
- Obtaining necessary permits and complying with local regulations is essential before starting the installation process.
Determine Energy Needs
To determine your energy needs for installing solar panels, calculate your average monthly kilowatt-hour consumption. This step is crucial as it helps you understand how much electricity your solar panels will need to generate to meet your household’s energy demands.
To begin, gather your electricity bills from the past year to get an accurate estimate of your monthly consumption. Take note of the kilowatt-hour (kWh) usage for each month and calculate the average.
Once you have the average monthly kWh consumption, you can use this information to determine the size of your solar panel system. Keep in mind that the size of the system will depend on factors such as the amount of available roof space and your budget.
It’s also important to consider whether you want an off-grid or grid-tied system. For off-grid systems, you’ll need to use an off-grid solar load calculator to determine the number of panels and batteries required. On the other hand, if you opt for a grid-tied system, research if your utility provides a net metering box. Additionally, consider if you need a battery and charge controller based on your system type.
To determine your energy needs for installing solar panels, calculate your average monthly kilowatt-hour consumption. This step is crucial as it helps you understand how much electricity your solar panels will need to generate to meet your household’s energy demands.
To begin, gather your electricity bills from the past year to get an accurate estimate of your monthly consumption. Take note of the kilowatt-hour (kWh) usage for each month and calculate the average.
Once you have the average monthly kWh consumption, you can use this information to determine the size of your solar panel system. Keep in mind that the size of the system will depend on factors such as the amount of available roof space and your budget.
Because much of the installation work happens on roofs and around sharp metal mounts, protecting your eyes should be part of system sizing and planning. If you wear corrective lenses, consider certified options like wiley x prescription safety glasses, which combine prescription optics with ANSI Z87+ impact-rated protection to guard against flying debris and grit. Choosing anti-fog and scratch-resistant coatings also keeps vision clear during long installs or when moving between hot and cool conditions. Including a well‑fitting pair in your toolkit reduces the chance of injury and helps maintain focus while you work.
Assess Property and Choose Location
To assess your property and choose the best location for your solar panels, there are several important points to consider.
First, evaluate the sun exposure of your property to determine the ideal location for maximum sunlight. Take into account any potential shading from trees or neighboring buildings that could affect the panel’s efficiency.
Additionally, ensure that the chosen installation area has easy access for maintenance and is structurally capable of supporting the weight of the panels.
Property Assessment Process
Before beginning the installation process, it’s crucial to assess your property and carefully select the optimal location for your solar panels. This step is essential to ensure maximum energy efficiency and a successful DIY solar panel installation.
Here are three key points to consider during the property assessment process:
- Sunlight Exposure: Determine the areas on your property that receive the most sunlight throughout the day. Solar panels require direct sunlight to generate electricity, so choose a location with minimal shade obstruction.
- Roof Orientation: Assess the orientation and slope of your roof. South-facing roofs with a tilt between 30 to 45 degrees typically offer the best solar potential. However, east and west-facing roofs can also work well depending on your location.
- Structural Integrity: Evaluate the condition of your roof and ensure it can support the weight of the solar panels. Consider any potential obstructions like chimneys or vents that may need to be relocated.
Location Selection Criteria
Consider the following criteria when assessing your property and choosing the optimal location for your solar panel installation.
First, evaluate the orientation of your roof and the amount of shading it receives. South-facing roofs generally receive the most sunlight, making them ideal for solar panels.
Next, assess the available space on your property. Make sure you have enough room to accommodate the size of the DIY solar panel kits you plan to install.
Additionally, consider the exposure to sunlight throughout the day and across seasons. You want to choose a location that receives maximum sunlight to ensure optimal energy production.
Also, evaluate the structural integrity of the installation site. Ensure that your roof or ground can support the weight and mounting requirements of the solar panels.
Finally, be aware of any local regulations and zoning laws that may affect the location selection process.
Installation Considerations
Assess your property for optimal sun exposure and available space to determine the ideal location for your solar panel installation. Consider the following factors:
- Unobstructed Sunlight: Choose a location that’s free from shading caused by trees, buildings, or other structures. This will ensure maximum sunlight capture and energy production.
- Orientation and Tilt: Determine the best orientation and tilt angle for your solar panels to maximize their efficiency throughout the day. This will vary depending on your location and the angle of the sun.
- Structural Integrity: Evaluate the strength and stability of the installation location, whether it’s a roof or ground mount. Ensure that it can support the weight of the solar panels and withstand any weather conditions.
Choose DIY Solar Kit
To begin your DIY solar panel installation, select a DIY Solar Kit that suits your energy needs and budget. A DIY solar kit is an all-in-one package that includes everything you need to build and install your own solar panels. These kits are designed to make the installation process as simple and straightforward as possible, even for those with little to no technical experience.
When choosing a DIY solar kit, it’s important to consider your energy needs. Determine how much electricity you consume on a daily basis and select a kit that can generate enough power to meet your requirements. Additionally, take into account your budget and choose a kit that fits within your price range.
DIY solar kits come with comprehensive installation instructions, similar to assembling IKEA furniture. These step-by-step guides make the installation process easy to follow, ensuring that you can complete your DIY solar project without any complications. In case you encounter any difficulties, most kits also offer customer support to assist you along the way.
Related Post: The 6 Best DIY Solar Power Kits for Homes: Our Top Picks for You.
Buy or Lease Solar Panels
If you’re looking to invest in solar panels, you have the option to either buy or lease them based on your financial situation and preferences.
Here are three important factors to consider when deciding whether to buy or lease solar panels:
- Long-term ownership and potential cost savings: When you buy solar panels, you become the owner and can benefit from long-term cost savings. Over time, the energy generated by your solar panel system can offset your electricity bills, providing significant savings.
- Lower upfront costs and maintenance coverage: Leasing solar panels allows you to avoid high upfront costs. Instead, you pay a monthly fee to the leasing company. Additionally, the leasing company is responsible for maintenance and repairs, which can be a relief for those who don’t want to deal with the hassle.
- Tax incentives and increased property value: Owning solar panels may qualify you for tax incentives, such as federal tax credits. Furthermore, installing a solar panel system can increase the value of your property, making it a wise investment.
To make an informed decision, evaluate the financial benefits, ownership advantages, and long-term implications of buying or leasing solar panels. Research and compare the costs, terms, and benefits of each option to find the most suitable one for your needs.
Obtain Necessary Permits
To obtain necessary permits for your solar panel installation, you need to navigate the permit application process. Start by contacting your local government or building department to inquire about the specific permits required for solar panel installation in your area. They’ll provide you with a checklist of required documentation and guidelines to follow.
Additionally, familiarize yourself with local zoning regulations to ensure your installation complies with the rules and regulations of your area.
Permit Application Process
Before you begin installing your solar panels, it’s crucial to research local regulations and obtain the necessary permits for your installation. To navigate the permit application process smoothly, follow these steps:
- Contact your local building department: Reach out to your local building department to understand the specific permit application process for solar panel installation in your area. They can provide you with the necessary forms and information on fees.
- Understand the requirements: Take the time to familiarize yourself with the specific requirements and documentation needed for permit applications. This may include information about your roof, electrical systems, and the installation plan.
- Submit the applications: Once you have gathered all the necessary information and completed the forms, submit the permit applications along with the required fees. Ensure that you comply with all building and electrical codes to increase the chances of approval.
Required Documentation Checklist
Before proceeding with the solar panel installation, it is essential to ensure that you have obtained the necessary permits by following the required documentation checklist. This checklist will help you navigate through the process smoothly and ensure that you comply with all local regulations and codes.
Here is a step-by-step guide to obtaining the required documentation:
| Documentation | Description |
|---|---|
| Research local permit requirements and regulations | Familiarize yourself with the specific permit requirements and regulations in your area. This information can usually be found on your local municipality’s website or by contacting the relevant authority. |
| Obtain building permits and electrical permits | Contact your local municipality or relevant authority to obtain the necessary building permits and electrical permits for your solar panel installation. These permits ensure that your installation meets safety standards and is in compliance with local building codes. |
| Submit a solar panel system design and location plan | Prepare a detailed system design and location plan for your solar panel installation. This document should include the number and layout of panels, electrical connections, and any other relevant information. Submit this plan to the local municipality or relevant authority for approval. |
| Provide documentation showing compliance with zoning and building codes | Ensure that your solar panel installation complies with zoning and building codes in your area. This may require providing documentation such as setback measurements, roof load calculations, and other relevant information. |
| Keep a record of all approved permits and documentation | Once you have obtained all the necessary permits and documentation, make sure to keep a record of them for future reference. This will help you in case of any inspections or inquiries in the future. |
Local Zoning Regulations
To ensure a smooth and compliant DIY solar panel installation, it’s crucial to familiarize yourself with the local zoning regulations and obtain the necessary permits from your local government or municipality. Here are some important points to consider:
- Research local zoning regulations: Take the time to understand the specific requirements for solar panel installation in your area. This will help you determine what permits and documentation you need to obtain.
- Obtain necessary permits: Before you start your DIY solar panel installation, make sure you have all the required permits from your local government or municipality. This will ensure that your project is legal and meets all necessary regulations.
- Comply with setback and placement requirements: Local zoning regulations may have specific setback and placement requirements for solar panels. Be sure to adhere to these guidelines to avoid any issues.
Gather Required Tools
To gather the required tools for installing your solar panel, you’ll need a screwdriver, wrench, and pliers for assembling the components. These tools are essential for any DIY project involving solar panel installation. Additionally, you’ll need a ladder and a safety harness to safely access the installation area. It’s important to prioritize safety when working at heights.
Next, you’ll require a drill and appropriate drill bits for securing the racking system. The racking system holds the solar panels in place and ensures their stability. A sturdy and well-secured racking system is crucial for the longevity and efficiency of your solar panel installation.
In addition, wire cutters and a crimping tool will be needed for handling electrical wiring. These tools allow you to cut and properly connect the wires, ensuring a safe and reliable electrical connection.
To ensure accurate and level installation of the solar panels, you should also have a level and measuring tape. These tools will help you align the panels correctly and ensure that they’re positioned optimally for maximum sunlight exposure.
Purchase Additional Materials
Consider creating a comprehensive list of additional materials required for the solar panel installation, including mounting hardware, wiring, and connectors. To ensure a successful DIY solar panel installation, it’s important to have all the necessary materials on hand. Here are three key items to include in your list:
Extra Solar Panels or Batteries:
- While you may only need a specific number of solar panels initially, it’s wise to consider purchasing a few extras.
- This will allow you to expand your system’s capacity in the future.
- Additionally, investing in extra batteries can provide you with backup power during times of low sunlight or emergencies.
Essential Tools:
- To streamline the installation process, invest in tools that will make your job easier.
- A multimeter will help you measure the voltage and current of your solar panel system, ensuring its efficiency.
- Wire strippers are necessary for cutting and stripping the insulation from the wires, while a conduit bender will assist in bending conduit pipes accurately.
Safety Equipment and Spare Parts:
- Prioritize your safety by purchasing fall protection gear, such as a harness and safety lines.
- It’s also crucial to have proper work attire, including gloves and safety glasses.
- Additionally, consider buying spare parts and components to have on hand for any future repairs or maintenance requirements.
Acquire Safety Equipment
To ensure your personal safety during the DIY solar panel installation process, it’s crucial to acquire the necessary safety equipment.
- Start by obtaining safety glasses to protect your eyes from potential debris or accidents.
- Make sure to have work gloves to safeguard your hands while handling equipment and materials.
- Consider wearing a hard hat to provide protection for your head throughout the installation process.
Safety Gear Checklist
Ensure your safety during the solar panel installation process by acquiring the necessary safety gear. Here is a checklist of essential safety equipment you should have:
- Safety glasses: Protect your eyes from any potential hazards during the installation process. This includes debris, dust, and flying objects.
- Work gloves: Keep your hands safe from sharp edges, tools, and potential injuries. They provide extra grip and protection while handling equipment and materials.
- Hard hat: Protect your head from falling debris and potential impacts. It’s crucial when working at heights or in areas where objects may fall.
Essential Protective Equipment
To safely proceed with the installation of DIY solar panels, it’s essential to acquire the necessary protective equipment, ensuring your safety throughout the process. Working with solar panels can pose potential hazards, so it’s vital to have the right safety gear.
Start by obtaining safety glasses to shield your eyes from debris or flying objects. Work gloves will protect your hands from sharp edges and electrical components. A hard hat will safeguard your head from falling objects, while a harness and lanyard will prevent falls from elevated areas. Lastly, safety shoes with slip-resistant soles will provide stability and protect your feet from any potential accidents.
Acquiring and wearing the appropriate protective equipment is a crucial step in ensuring a secure and accident-free installation of your DIY solar panels.
Precautions for Personal Safety
Start by acquiring the necessary safety equipment to protect yourself during the DIY solar panel installation process. Prioritize your personal safety by investing in the appropriate gear. Here are three essential items you should have:
- Safety glasses: Shield your eyes from debris and potential hazards while working on the solar panels.
- Work gloves: Protect your hands from cuts, abrasions, and electrical shocks during the installation process.
- Hard hat, harness and lanyard, and safety shoes: These items ensure your head, body, and feet are protected from falling objects and provide stability when working at heights.
Install Racking System
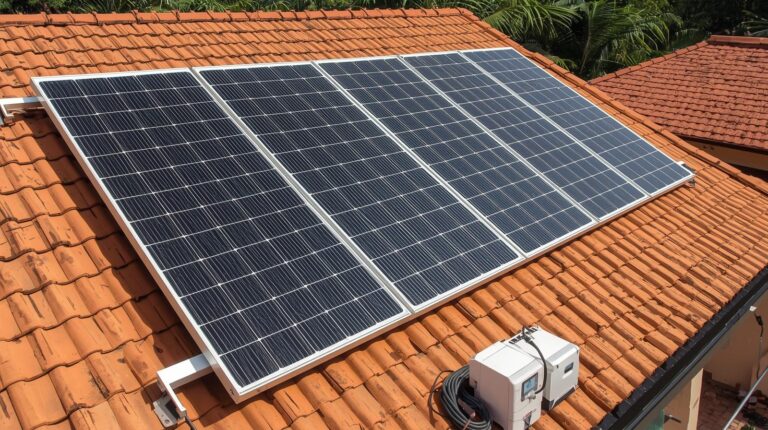
You can securely mount solar panels on your roof or the ground by properly installing the racking system. This step is crucial in ensuring that your panels are stable and able to absorb maximum sunlight.
Here’s a step-by-step guide on how to install the racking system for your DIY solar panel installation.
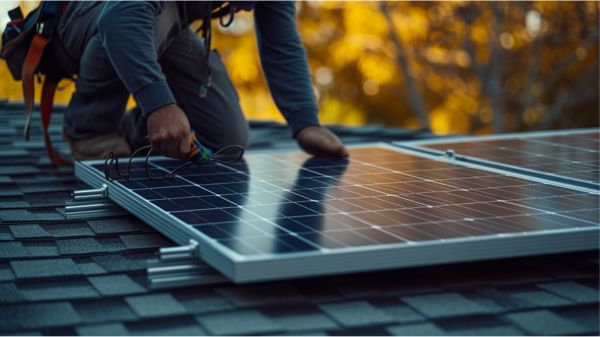
- For roof-mounted systems, start by marking the rafters. This will help you determine where to attach the bolt flashings. Install the racking rails by screwing them into the rafters using appropriate fasteners.
- If you’re opting for a ground-mounted system, you’ll need to build a metal foundation and pour concrete footings. Make sure the foundation is level and securely anchored to the ground.
- Regardless of the mounting location, you’ll need to dig trenches and anchor holes for the wiring. This will allow you to connect the solar panels to your electrical system.
- Consider the optimal angle for panel installation to maximize energy absorption. This angle will depend on your location and the time of year.
- Once the racking system is in place, securely fasten the panels using clamps. Ensure that they’re properly aligned and facing the right direction for optimal sunlight exposure.
- Finally, connect the wires before the final installation. Make sure all connections are secure and follow the manufacturer’s instructions for proper wiring.
Install Inverter
Now it’s time to install the inverter for your DIY solar panel system. There are different types and options to choose from, including microinverters and string inverters.
Once you’ve decided on the type of inverter, secure it to a suitable location near the solar panels for efficient wiring. Make sure to mount the inverter in a safe area to prevent overheating and potential damage.
Inverter Types and Options
To install the inverter, consider the placement and type of inverter that will best suit your solar panel system. There are different options available when it comes to inverter types and installation methods. Here are three options to consider:
- Microinverters: These can be easily screwed onto the back frame of each solar panel. They work independently, providing individual power conversion for each panel. This allows for better performance monitoring and increased energy production.
- String inverters: These inverters are wall-mounted close to the panels, usually in an easily accessible location. They’re connected to multiple panels in a series, converting the DC power from the panels into AC power for use in your home. This installation method is efficient for wiring and can be cost-effective for larger systems.
- Inverter installation options: When installing solar panels, it’s important to consider the type of inverter that will work best for your specific needs and the placement of the inverter. The placement should be in a location that’s easily accessible for maintenance and monitoring.
Choosing the right inverter type and installation method is crucial for the overall performance and efficiency of your solar panel system. Consider your specific requirements and consult with a professional to ensure you make the best decision.
Mounting the Inverter
To mount the inverter, securely attach it to a wall near the panels to optimize wiring efficiency and prevent damage. Follow these steps for a successful installation.
- Choose a suitable location that’s close to the solar panels and easily accessible for maintenance. Ensure the wall is sturdy enough to support the weight of the inverter.
- Use mounting brackets or screws provided by the manufacturer to secure the inverter to the wall. Make sure it’s level and tightly fastened.
- Connect the inverter carefully to the solar panel system according to the manufacturer’s instructions. Double-check all connections to ensure they’re secure.
- Once installed, test the inverter to ensure it’s functioning properly and efficiently.
Now you have successfully mounted the inverter for your DIY solar panel installation.
Connecting the Inverter
Position the inverter in close proximity to the solar panels to ensure efficient wiring and optimal performance. Here’s what you need to do to connect the inverter for your DIY solar panel installation:
- Securely mount the inverter following the manufacturer’s instructions. This ensures safety and helps achieve the best performance for your system.
- Connect the inverter to the solar panels using the proper wiring protocols. Make sure to follow the recommended guidelines to ensure a reliable connection.
- Connect the inverter to your electrical system, ensuring that the wiring is done correctly. This step is crucial for the proper functioning of your DIY solar system.
Remember to consider the size and power requirements of your devices when selecting the appropriate inverter. It’s also important to install the inverter in a well-ventilated area to prevent overheating and ensure safety.
Install Solar Panels
Start by ensuring that you have all the necessary tools and equipment ready for the installation of your DIY solar panels. This includes solar panels, mounting brackets, screws, a power drill, a ladder, a wrench, and safety equipment such as gloves and safety glasses.
Before installing the solar panels, you need to attach the racking system to your roof. This involves measuring and marking the positions for the brackets, drilling holes, and securing the brackets in place. Make sure to follow the manufacturer’s instructions for proper installation.
Once the racking system is in place, it’s time to install the solar panels. Start by positioning the first panel on the roof and aligning it with the brackets. Secure the panel using the screws provided. Repeat this process for the remaining panels, making sure they’re evenly spaced and properly aligned.
After the panels are installed, you need to wire the system. This involves connecting the solar panels to the inverter, which converts the DC power generated by the panels into AC power that can be used in your home. Follow the wiring diagram provided by the manufacturer to ensure proper connections.
Once the wiring is complete, it’s important to perform a thorough inspection of the system to ensure everything is properly installed and secure. Check for any loose connections or damaged components.
Congratulations! You have successfully installed your DIY solar panels. Now it’s time to enjoy the benefits of solar power and start saving on your energy bills. Remember to regularly monitor and maintain your system to optimize its performance and longevity.
Install Battery
Once you have completed the installation of your solar panels, it’s time to proceed with the installation of the battery. The battery backup is an essential component of your solar panel system as it stores excess energy generated by the panels for later use.
To install the battery, follow these steps:
- Prepare the site: Choose a suitable location for the battery, considering factors such as accessibility, ventilation, and protection from extreme temperatures. Ensure the area is clean and free from any obstructions.
- Perform electrical and mechanical installation: Connect the battery to the inverter and solar panels using appropriate wiring and connectors. Follow the manufacturer’s instructions carefully to ensure proper installation. Make sure all connections are secure and insulated.
- Commission the battery: Once the installation is complete, test the battery backup system to ensure it’s functioning correctly. Monitor the performance and check for any potential issues. Adjust the settings if necessary to optimize the energy storage capacity.
Remember to prioritize safety during the installation process. Wear appropriate protective gear and follow safety guidelines to prevent accidents or damage.
Choose a battery that suits your energy storage needs and consider its capacity and lifespan. Regularly monitor and maintain the battery to ensure its optimal performance and longevity.
With the battery backup successfully installed, you can now enjoy the benefits of a DIY solar panel system that provides clean and reliable energy.
Wire the System
To wire the system, carefully route and terminate the wires from the solar panels to the inverter and battery system, ensuring efficient and safe electrical connections. This step is crucial to the overall functionality of your solar panel system. Here’s how you can wire the system properly.
First, connect the wires from the solar panels to the inverter. Use appropriate wire gauges and connectors to ensure efficient power flow. Route the wires through the junction box and PV disconnect switch, then terminate them at the home’s circuit breaker box for grid connection. It’s important to follow safety guidelines and local electrical codes during this process to ensure a safe installation.
Double-check all wiring connections and polarity to avoid potential system malfunctions. Any loose or improperly connected wires can lead to inefficiencies or even damage your solar panel system. Take your time and make sure all connections are secure and properly tightened.
Keep in mind that electrical work can be complex and dangerous, especially when dealing with high voltages. If you’re not comfortable with the process, it’s always best to hire a professional to handle the installation for you.
While DIY installation can help save on installation costs, it’s crucial to prioritize safety and ensure the system is properly designed and installed to maximize its efficiency and longevity.
Schedule and Pass Solar Inspection
To ensure the successful completion of your DIY solar panel installation, it’s crucial to schedule and pass a solar inspection with the relevant local authorities or inspection agencies. This inspection is necessary to ensure that your solar installation meets all necessary requirements and standards.
Here are the steps to schedule and pass a solar inspection:
- Contact your local authorities or inspection agencies to schedule the solar inspection. Provide them with the necessary information about your solar panel installation, such as the location, size, and type of system.
- Be present during the inspection to address any queries or concerns from the inspector. It’s important to be knowledgeable about your solar panel installation and be prepared to answer any questions.
- After the inspection, the inspector will provide you with a report detailing any corrections or post-inspection requirements that need to be addressed. It’s important to complete these requirements as advised by the inspector.
- Once you have made the necessary corrections, schedule a follow-up inspection to ensure that everything is up to standard.
- After passing the solar inspection, make sure to obtain the necessary permits and certificates to validate your solar panel installation.
Complete Interconnection
To successfully complete the interconnection process for your DIY solar panel installation, you need to ensure compliance with local regulations, arrange for necessary inspections and approvals, and implement safety measures to protect against back-feed. Interconnection refers to the process of connecting your solar panel system to the electrical grid, allowing you to feed excess solar-generated electricity back into the grid.
One important aspect of interconnection is understanding the requirements for grid connection and interconnection agreements with your local utility company. These agreements outline the terms and conditions for connecting your solar system to the grid and ensure a smooth integration of your solar power into the existing electrical infrastructure.
Another crucial step is to ensure compliance with local regulations and codes for grid-tied solar systems. This may include obtaining permits and following specific guidelines for system design and installation. Compliance is essential to ensure the safety and reliability of your system.
Arranging for inspections and approvals from the utility company and local authorities is also a necessary part of the interconnection process. These inspections will ensure that your system meets all the necessary safety and performance standards.
Implementing safety measures is crucial to protect against back-feed, which can occur when solar-generated electricity flows back into the grid during a power outage. Installing a back-feed protection device or an automatic shut-off switch will help prevent any potential harm to utility workers or damage to the grid.
In order to finalize the interconnection process, you will need to coordinate with the utility company. They will confirm that your system meets all the necessary requirements and will provide you with the necessary documentation to start feeding solar-generated electricity into the grid.
To summarize, completing the interconnection process involves ensuring compliance with local regulations, arranging for inspections and approvals, implementing safety measures, and coordinating with the utility company. By following these steps, you can successfully integrate your DIY solar panel system into the electrical grid and start enjoying the benefits of renewable energy.
| Steps to Complete Interconnection | Description |
|---|---|
| Understand grid connection and interconnection agreements | Familiarize yourself with the requirements and agreements with your local utility company. |
| Ensure compliance with local regulations and codes | Obtain necessary permits and follow guidelines to meet safety standards. |
| Arrange for inspections and approvals | Schedule inspections with utility company and local authorities. |
Frequently Asked Questions
Is It Easy to Install Solar Panels Yourself?
Installing solar panels yourself can be easy if you follow the step-by-step instructions provided. The pros include saving money and gaining independence from the grid. Avoid common mistakes by using the right tools and equipment. Calculate your energy needs before starting.
How Do You Install Solar Panels for Beginners?
Installing solar panels for beginners is affordable, with DIY kits available. Obtain necessary permits, follow step-by-step instructions, and ensure optimal panel maintenance. Maximize energy production by positioning panels correctly and monitoring efficiency regularly. Liberation awaits!
How to Build a Simple Solar Panel System?
To build a simple solar panel system, start by researching cost-effective options and understanding solar panel efficiency improvements. Check local permits and regulations for installation, and learn about maintenance tips to ensure optimal performance.
How Big of a Solar Panel Do You Need to Run a Whole House?
To run your whole house on solar power, determine your energy needs and assess roof space and sunlight exposure. Consult a solar professional to choose the right size and type of panel system.
Conclusion
With the help of this easy DIY solar panel installation guide, you can take control of your energy needs and save money in the long run. By following the step-by-step instructions and using the resources available, you can install your own solar panel system and enjoy the benefits of renewable energy. So why wait? Start your journey towards a more sustainable future today!
Watch the following video to learn more about DIY Home Energy by Jeff Davis!