Are you ready to harness the power of the sun and make a positive impact on the environment? Look no further! In this article, we will guide you through the 8 best steps for installing solar panels. From assessing the suitability of your roof to connecting your solar power system to the grid, we’ve got you covered.
Get ready to take control of your energy needs and join the growing community of solar panel enthusiasts. Let’s get started!
Key Takeaways
- Assess roof suitability and energy needs before installing solar panels
- Calculate power consumption and assess available sunlight for accurate energy needs assessment
- Research solar panel options, obtain necessary permits and approvals
- Select a professional installer and prepare the roof for installation
Assessing Roof Suitability
Assess whether your roof can accommodate solar panels by checking for proper orientation and shading. Conducting a roof evaluation is crucial to determine if your roof is suitable for solar panel installation.
Start by examining the orientation of your roof. South-facing roofs are ideal, as they receive the most sunlight throughout the day.
Next, perform a shade analysis to identify any obstacles that may block sunlight from reaching the panels. Trees, nearby buildings, or chimneys can cast shadows on your roof and reduce solar panel efficiency. Use shade analysis tools or consult with a professional to accurately assess the shading on your roof.
Determining Energy Needs
To determine your energy needs for solar panel installation, you must first calculate your power consumption. This involves assessing your electricity bills and identifying your average monthly usage.
Additionally, it’s crucial to evaluate the amount of available sunlight in your area, as this will directly impact the efficiency and output of your solar panels.
Calculating Power Consumption
Determine your energy needs by assessing your power consumption. To accurately calculate your power consumption, follow these steps:
- Identify all the electrical appliances and devices in your home that consume electricity.
- Determine the power rating (in watts) of each appliance. This information is usually listed on the appliance or in the user manual.
- Estimate the average number of hours each appliance is used per day.
- Multiply the power rating of each appliance by the number of hours it’s used to calculate the daily energy consumption in watt-hours.
By calculating the power consumption of each appliance, you can get an accurate estimate of your energy needs.
Remember to consider energy-efficient appliances when making your calculations. These appliances are designed to use less energy, which can help reduce your overall power consumption.
Assessing Available Sunlight
To accurately assess your energy needs, take into account the available sunlight by analyzing the amount of sunlight your location receives throughout the day. Evaluating shade coverage is crucial in determining the optimal placement of solar panels.
Start by identifying any obstructions such as trees, buildings, or nearby structures that could cast shadows on the panels. This will help you determine the areas with the most uninterrupted sunlight.
Additionally, analyzing angle optimization is essential for maximizing energy production. Solar panels should ideally be installed at an angle that allows them to receive the most sunlight throughout the day. Factors such as the latitude of your location, seasonality, and the tilt of the panel can affect the angle optimization.
Researching Solar Panel Options
Before you can begin researching solar panel options, it’s important to consider your budget and find a cost-effective solution that meets your needs.
There are different types of solar panels available, such as monocrystalline, polycrystalline, and thin-film.
Each type has its own advantages and disadvantages, so it’s essential to research and compare them to determine which one is the best fit for your specific requirements.
Cost-Effective Solar Panel
Researching solar panel options can help you find a cost-effective solution for your installation. By considering the following cost-saving strategies and financial incentives, you can make an informed decision that maximizes your return on investment:
- Compare prices: Research different solar panel manufacturers and suppliers to find the best price. Consider factors such as panel efficiency, durability, and warranty.
- Evaluate financial incentives: Look into federal, state, and local incentives that can help offset the cost of solar panel installation. These may include tax credits, rebates, and grants.
- Consider leasing or financing options: Explore leasing or financing programs offered by solar companies. These options can help you install solar panels with little or no upfront cost, allowing you to start saving on electricity bills immediately.
- Assess long-term savings: Calculate the potential long-term savings of installing solar panels. Consider factors such as reduced electricity bills, increased property value, and the lifespan of the panels.
Different Types Available?
When considering the different types of solar panels available, you should explore their efficiency, durability, and warranty. To help you make an informed decision, here is a table summarizing the key features of various solar panels:
| Panel Type | Efficiency | Durability | Warranty |
|---|---|---|---|
| Monocrystalline | High | Very durable | 25 years |
| Polycrystalline | Moderate | Moderately durable | 20 years |
| Thin-Film | Low | Less durable | 15 years |
| Bifacial | High | Very durable | 25 years |
| PERC | High | Very durable | 25 years |
Different panel sizes are available to suit your specific energy needs. Smaller panels are ideal for residential installations, while larger panels are more suitable for commercial purposes. It is essential to consider the installation process, which involves mounting the panels on rooftops or ground structures.
Professional installation ensures proper alignment, wiring, and connection to the electrical system. By understanding the different panel options and the installation process, you can choose the most suitable solar panels for your requirements.
Obtaining Necessary Permits and Approvals
To successfully install solar panels, you’ll need to begin by obtaining the necessary permits and approvals. This ensures that you comply with local regulations and prevent any potential legal issues.
Here are the steps to follow when obtaining the required permits:
- Research permit requirements: Start by researching the specific permit requirements in your area. This may include filling out application forms, providing documentation, or paying fees.
- Contact the local authorities: Reach out to your local building department or zoning office to inquire about the necessary permits. They’ll provide you with the relevant information and guide you through the application process.
- Submit the application: Once you have gathered all the necessary documents, submit your permit application. Be sure to include any required plans or specifications.
- Await approval: After submitting your application, you’ll need to wait for approval. This process may take some time, so be patient. Once approved, you can move forward with your solar panel installation.
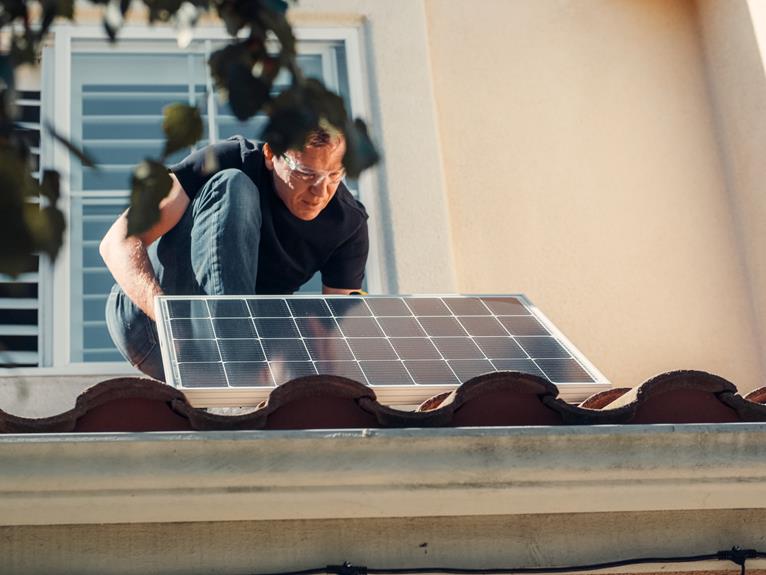
Selecting a Professional Installer
To ensure a successful installation, it is important to select a professional installer for your solar panels. Hiring a professional with the right qualifications and experience will ensure that the installation process is done correctly and efficiently.
When choosing an installer, look for certifications such as NABCEP (North American Board of Certified Energy Practitioners) and licenses that demonstrate their expertise in solar panel installation. Additionally, consider their track record and customer reviews to gauge their reliability and customer satisfaction.
To help you make an informed decision, here is a table highlighting the key qualifications to look for in a professional installer:
| Qualification | Description |
|---|---|
| NABCEP Certification | Demonstrates expertise in industry best practices and adherence to high standards |
| State License | Ensures compliance with local regulations and permits |
| Experience | Look for a proven track record of successful installations and positive customer feedback |
Preparing the Roof for Installation
To properly prepare your roof for the installation of solar panels, you’ll need to assess its condition and make any necessary repairs. Here are the best steps to ensure your roof is ready for the installation:
- Begin with a thorough roof inspection: Look for any signs of damage, such as cracked or missing shingles, leaks, or weakened areas. Address these issues before proceeding.
- Reinforce the roof structure if needed: Solar panels can add extra weight to your roof, so it’s crucial to ensure the structure can handle the load. Consult a professional if you have any concerns.
- Clean and maintain the roof: Remove any debris or moss that may have accumulated. This will help improve the longevity and performance of your roof.
- Ensure roof safety: Install safety measures such as guardrails or anchor points to protect workers during the installation process.
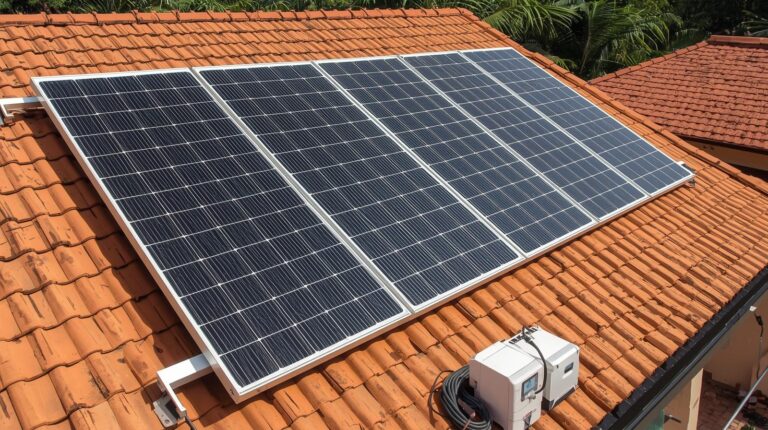
Installing the Solar Panels
Start by positioning the solar panels on the designated area of your roof. Ensure that the panels are facing the right direction to maximize sunlight absorption. Use appropriate mounting equipment to secure the panels in place.
Next, connect the panels to the inverter, which converts the direct current (DC) generated by the panels into alternating current (AC) that can be used to power your home. Make sure to follow the manufacturer’s instructions and safety guidelines during the installation process.
Once the panels are installed, it’s crucial to regularly inspect and maintain them to ensure optimal performance. Clean the panels periodically to remove any dirt or debris that may hinder sunlight absorption. Additionally, check for any loose connections or damaged components and address them promptly.
Connecting the Solar Power System to the Grid
Now you’ll connect your solar power system to the grid by following these simple steps:
- Contact your local utility company: Before connecting your solar power system to the grid, it’s important to inform your utility company about your intentions. They’ll guide you through the necessary procedures and provide you with any specific requirements.
- Install a grid connection device: A grid connection device, also known as an inverter, converts the direct current (DC) generated by your solar panels into alternating current (AC) that can be used by your home appliances and sent back to the grid.
- Arrange for net metering: Net metering allows you to receive credit for excess electricity generated by your solar panels. Contact your utility company to set up a net metering agreement, which ensures a fair exchange of energy between your solar power system and the grid.
- Complete the grid connection process: Once your grid connection device and net metering agreement are in place, your solar power system can be safely connected to the grid. A certified electrician will handle the final wiring and inspections to ensure everything is properly connected and functioning.
Conclusion
By following the 8 best steps for installing solar panels, you can ensure a successful and efficient transition to renewable energy.
Assess your roof suitability, determine energy needs, research panel options, obtain necessary permits, select a professional installer, prepare the roof, install the panels, and connect the system to the grid.
With careful planning and attention to detail, you can harness the power of the sun and make a positive impact on the environment.