13 Wood Joinery Types – Various Methods for Connecting Wood
1. Basic Butt Joint
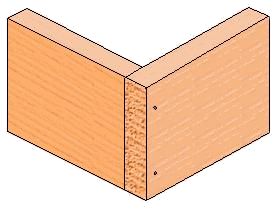
Butt Joints are the most basic method for connecting two pieces of wood, and while it isn’t the strongest of joints, it is very useful in some situations. You can learn how to make a butt joint by using proper technique to ensure that your butt joints are as strong as possible.
As shown in the picture, a butt joint is where one piece of stock is butted against another and affixed with glue. The joint is usually strengthened by screws or nails.
Square Cuts are Key:
The key to a quality butt joint is to make certain that the ends of the two boards are cut as square as possible. This is easiest using a miter saw, although quality results can be obtained by using a circular saw and a Layout Square, provided that angle of the blade of the circular saw is set to zero-degrees.
Glue Provides the Strength:
The strength of a butt joint comes from the glue in the joint. However, there are two problems with using glue as the only means of holding the connection.
First, when glue is applied to the end grain of a board, it tends to soak into the stock far more than glue applied to the side of the grain. The end grain is the most porous part of the wood, so you may need to apply a bit more glue than normal.
Second, the glue will not provide much in the way of lateral strength. As such, it is advisable to use some screws or nails to strengthen the joint. If using hardwood for your project, be certain to pre-drill the pilot holes before inserting screws into the joint, or you’ll split the stock and have a bigger problem on your hand than a weak butt joint.
2. Mitered Butt Joint
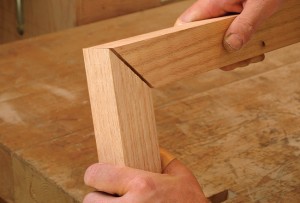
The butt joint is the most basic woodworking joint, where two pieces of wood are butted together (most often at a right angle to one another), but it isn’t the most prettiest of joints, since the end grain of one of the two boards will be visible.
When you want a more attractive option, try a mitered butt joint. It won’t be any stronger than a standard butt joint, but you won’t see the end grain.
Angles Must be Precise:
As in a basic butt joint, the most important aspect of creating a mitered butt joint is to cut the angles precisely. For this, you’ll need a compound miter saw.
The first step is to determine the final angle of the joint and divide that number by two. For a square connection (90-degrees), you’ll need to make a 45-degree angle cut on each of the two boards to be joined. If the two pieces of stock are exactly the same width, the two cut ends should match up perfectly.
You can also use mitered butt joints when creating other joints of other angles. For example, if you were making an octagonally-shaped picture frame, each of the eight angles would be 45-degrees (rather than 90-degrees in the previous example). As such, you would cut 22 1/2-degree angles on each end to create the butt joints.
Glue Holds the Joint:
As in a basic butt joint, the glue is the means for holding the joint. However, because both sides of the glue joint will be on porous end grain, you will likely need to use more woodworking glue than when gluing on side grain.
TIP:Be sure to dry-fit your pieces before applying glue, to ensure a proper fit. For instance, if you’re making a picture frame, cut all lengths and angles and cross-check the frame for squareness and make sure that the joints have no gaps before applying glue.
Use Mechanical Fasteners for Strength:
As with a basic butt joint, there isn’t a lot of strength in a mitered butt joint. As such, you may wish to strengthen the joint by using nails, brads or screws to give lateral strength to the joint. If using hardwood, remember to pre-drill before installing screws to avoid splitting.
3. Half-Lap Joint
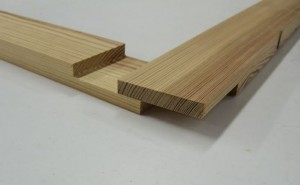
Half lap joints are among the most basic of woodworking joints, but there are times where they are the perfect choice for connecting two pieces of stock.
A half lap joint is where two pieces of stock, which are typically of the same thickness, have half of the material removed so that the two boards fit together so that the joint adds no thickness at the joint.
These joints work well for right-angle connections, such as the joint shown in the image on this page (for this illustration, one piece of stock is colored blue and the other green).Both boards have material removed so that they fit together seamlessly.
When to Use Half Lap Joints:
I find half lap joints work well when using one to two inch thick stock, such as in car cases for furniture pieces such as dressers & desks, especially where drawers will be installed. The half lap adds sturdiness to the internal structure without adding additional height.
The half-lap joint can be quite strong when properly used. However, be advised that thin pieces of stock may be weakened by removing half of the material to accommodate the joint, so use this connection only when the stock is thick enough to maintain the structural integrity of the board after half of the material is removed.
How to Cut Half Lap Joints:
There are a number of tools that can be used to cut half laps, but my favorite is to use a stacked dado set on a radial arm saw. You’ll need to use a couple of pieces of scrap wood (the same thickness as the stock you’re going to be cutting) to get the depth set just right, but once you have the proper height setting on the radial arm, you’ll be able to cut a lot of half lap joints in a hurry.
If you don’t have a radial arm saw, you can do the same thing with a stacked dado set on a table saw, but its a bit more difficult to see your cut lines with the cut side facing down. Be sure to use your miter gauge to guide the stock through the blade.
You should never use the fence on the table saw for crosscuts, as the fence can cause the stock to bind. Another option, albeit somewhat primitive, is to use a circular saw to cut the half laps. After setting the depth, make the shoulder cuts at the cut lines to denote the edges of the joint, and then make a cut about every quarter of an inch.
Once you have a cut every quarter inch between the edges of the joint, use a hammer to knock out the thin pieces of stock that remain. After cleaning up the joint with a chisel, you should have a perfectly formed half lap joint.
Assembling the Joint:
When you’re ready to assemble the joint, place some woodworker’s glue on one of the two mating surfaces. Place the other piece of stock in place, and adjust the two pieces to their final positions. Then, hold the joint with a few wood screws, being certain to avoid protruding the screws through the back side of the joint. The glue will be the strength of the joint, but the screws are necessary to hold it until the glue dries.
Start Your Next Project With Teds’ Archive Of 16,000 Plans!
Instant access to all 16,000 woodworking plans with step-by-step details, photos, materials lists and more
Monthly free plans with lifetime membership access – No renewals, recurring fees or other charges
4. Tongue and Groove Joint
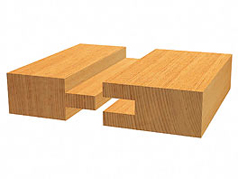
A tongue and groove joint is a unique woodwork joint that is attached edge to edge with two or more pieces of timber. It is made with one edge consisting of a slot that runs down the entire length of the timber and a tongue which fits into the slot.
This groove and tongue feature creates a reasonably strong and aesthetically pleasing joint that can be used in areas such as floorboards, lining boards, wood paneling and table tops. The tongue with a grove feature is easy to attach together because of its simplicity and it allows for a tight fit that has plenty of surface area for adhesives. These joints can be very difficult to make without the right woodwork machinery.
You are more likely to buy timber with this joint already in it, such as lining boards than you are to make it yourself. Because of the many types of timbers readily available with this particular type of joint it is probably best to buy what you need than to try and make the joint because it is much simpler than attempting to make the joint which requires great tools, machinery and skill.
Also you don’t often require much timber with this joint because it is used as more of a feature in most furniture so there usually isn’t a lot of it used
Step1:This joint is really only used for timber boards so the first thing you must do is measure and cut up some timber boards to your required length.
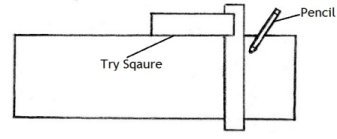
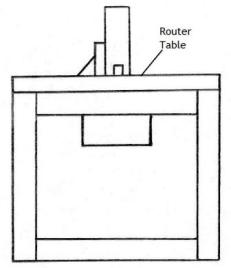
Step2: This step is not entirely necessary if you have some experience using a router but if not you need to mark the giving and receiving ends on your boards. Step3:This step needs to be done with a router bench to create a successful joint and the first thing you do is start with a router bit to cut the groove. After the groove has been cut you now use another router bit to cut the tongue.
Step4:Check to see if the joint fits tightly and if it does you can now glue and clamp the boards together which will interlock from your tongue and groove joints.
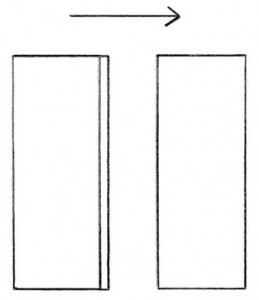
Tip: You can buy lining boards which already have tongue and groove joints cut which makes this option a simpler and easier method for people with time restraints or inexperienced woodworkers.
5. Mortise and Tenon Joint
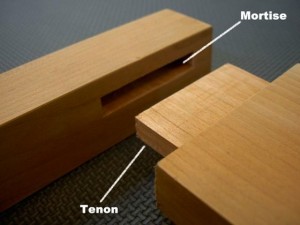
Types of the mortise and tenon joint have been used for centuries by woodworkers because of their combination of superior strength and simplicity. They are typically used when one piece of stock is joining to the other at 90-degrees, but may be used at a slightly lesser angle in certain circumstances.
Bear in mind that the joint is strongest when the two pieces of stock are at right angles to one another. The basic idea behind a mortise and tenon joint is that one piece of stock is inserted into the other, and then held in place with a fastener.
Today, most woodworkers would use glue to secure the tenon inside the mortise, but in years gone by, woodworkers would fashion the tenons so that they protruded through the mortised stock, to then be secured by a wedge or dowel.
Forming the Tenon:
Typically, the tenon is little more than a rectangular pin cut from the end of the stock. While tenons can be cut by hand, modern woodworkers will often employ a band saw or a tenoning jig on a table saw to safely form the tenon. When cutting a tenon, be careful not to remove too much material as thinner tenons equal weaker joints.
Cutting the Mortise:
Traditionally, mortises were cut into the receiving piece of stock using a chisel. Today, many woodworkers use a dedicated mortiser, which employs a drill bit encased inside a four-sided chisel. Many drill press manufacturers offer optional mortising attachments, making the drill press a much more versatile machine.
To cut a mortise using a mortiser, simply mark the position of the area to be cut, and then sink the bit into the material, taking small bites at a time. Set the depth stop to drill deep enough to encompass the entire length of the tenon, but no deeper than absolutely necessary (unless you are creating a through-tenon). When finished, use a sharp chisel to clean up any rough spots that remain.
Assembly:
Once the mortise and tenon have both been completed, dry fit the tenon into the mortise. The fit should be snug, but not excessively tight. Once all joints have been formed and its time for assembly, apply glue to both the tenon and inside the mortise. Coat all surfaces evenly using a small brush.
A word to the wise:
A good rule of thumb when creating mortise and tenon joints is to cut the mortise first, then the tenon. Leave the tenon a little bit fat and try your first dry fit. Its always better to have to take a little more off the tenon than to take too much and find you have a sloppy fit.
6. Biscuit Joint
 For certain types of woodworking joints such as edge-to-edge joints, miter joints, T-joints and corner joints, there is hardly a better choice than biscuit joints. Properly-cut biscuit joints are strong and accurate, particularly when cutting slots with a woodworking tool called a biscuit joiner (or plate joiner).
What is a Biscuit?
A biscuit is a thin, oval-shaped piece of compressed wood shavings, typically made from beech wood. When glued into slots precisely cut by the biscuit cutter, and the moisture from the glue causes the biscuit to swell and tighten the joint.
Biscuits commonly come in three sizes:
- #0 – 5/8″ x 1-3/4″
- #10 – 3/4″ x 2-1/8″
- #20 – 1″ x 2-3/8″
Biscuit cutters should have the ability to precisely cut all three sizes.
What Size Biscuit to Use?
As a general rule, try to use the largest size biscuit possible, as this will provide the greatest amount of strength to the joint. In most cases, use #20 biscuits, but when working on narrower material, switch to smaller biscuits where appropriate.
Edge-to-Edge Joints:
The most common type of biscuit joints are edge-to-edge joints. This is often used for gluing up table tops of various width boards of the same thickness, where biscuits are used along the planed long edges of the boards.
To glue up a table top of various boards, lay out the boards side-by-side with each board’s end grain turned in the opposite direction of that of the previous board. This will help keep the table-top stable when the boards expand or shrink.
Once the boards are in the proper positions, use a pencil to make marks across the joints every 4-6″. These will be the centerlines for the biscuit slots. Next, separate the boards and adjust your biscuit joiner for the appropriate size of biscuit. In the case of edge-to-edge joints, you’ll most likely use the large #20 size.
Placing the guide fence on top of the stock (perpendicular to the edge), align the cutting guide with the pencil mark. Hold the fence in place, start up the saw and once the motor is at full speed, smoothly plunge the blade into the stock until you can’t push any farther. Then, retract the blade fully and repeat at the next mark.
Once all of the slots have been cut, place a small amount of glue evenly throughout the slots on one edge and insert the biscuits. Then, apply a similar amount of glue into the opposite slots on the other edge and connect the two boards.
You’ll want to quickly glue up each edge of the table top and then clamp the entire assembly. Snug the clamps so that all of the gaps close completely, but be careful to avoid squeezing so hard that any glue in the joints is squeezed out. If any glue does squeeze out of the joints, be sure to wipe it off immediately to avoid affecting the finish later.
7. Pocket Joint
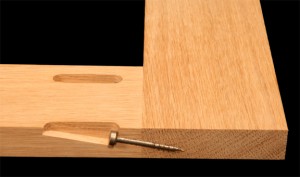
Pocket joints are nothing more than a screw that is driven diagonally through one board into another. Pocket joints are very similar to dowel joints and mortise & tenon joints.
To create a proper pocket joint, the path for the screw must be pre-drilled to avoid splitting the head piece. While this can be done by eye, an easier method for drilling consistent pocket joints is to use a pocket-hole jig.
The screw is driven through the head board into the tail stock. No glue is necessary, as the screw will hold the joint securely, but glue would definitely add strength to the joint.
Pocket Hole Jigs:
Improvements in pocket hole jig technology in recent years have made pocket joints not only easy, but often preferred in certain applications such as many types of face frames.
There are numerous different styles of pocket joints, but the basic idea is a jig with a machined aluminum guide cylinder is positioned at a precise angle in the jig. The jig is then clamped to the head board and a special bit the same diameter as the hole (with a much smaller bit on the tip) is used to drill through the aluminum cylinder into the head board.
Once the pocket hole has been drilled in the head board, the tail board is clamped into place and a screw is driven through the pocket hole into the tail board. If glue is to be added to strengthen the joint, it should be placed on the mating surface between the tail board and head board before inserting the screw(s).
Popular Uses for Pocket Joints:
While the most common use for pocket joints is in face frames, there are many other possible applications. Pocket joints can be used to join edges to make a table or cabinet top. They are also very effective when attaching relatively thick edge banding to plywood or a table top. Pocket joints can even be used to connect angled joints in woodworking projects such as braces for leg rails.
8. Dado
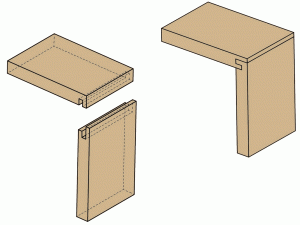
Using a dado is a very functional and strong method for connecting two pieces of stock. Once you learn how to cut a dado, you’ll find these woodworking joints especially useful when building cabinets or bookshelves.
A dado is a groove cut into one piece of wood into which another piece of wood will fit snugly. For instance, when building a bookshelf using 3/4″ thick stock, one would cut a 3/4″ wide groove into the shelf standard and then glue the shelf into the groove.
Methods for Cutting Dadoes:
There are a few different methods for cutting a dado. Probably the most common method is to use a stacked dado head cutter on a table saw. This consists of two 8″ diameter, 1/8″-kerf saw blades with a number of 1/8″ & 1/16″ chippers in between. By adding or removing chippers, you can get pretty much any width groove between 1/4″ and 3/4″.Wider dadoes can be cut by making more than one pass through the saw.
A stacked dado head cutter set should only be used on a table saw or on some radial arm saws (check the tool’s documentation to see if your table saw or radial arm saw will accommodate a stacked dado head cutting set). Do not attempt to use a stacked dado head cutting set on a circular saw, as this would be extremely dangerous. Another option is a “wobble” dado set.
This is a single saw blade set on an adjustable spindle. Adjusting the blade angle on the spindle will change the width of the dado. While these are much cheaper than a stacked dado head cutter set, the results are far less predictable, and in my experience, rarely acceptable. I’d resist the urge to buy a wobble dado and save my pennies for a quality stacked dado set. I’m also not entirely comfortable with the safety of using a wobble blade.
Cutting Dadoes With a Router:
Another popular method for cutting dadoes is to use a straight cutting bit on a router. When using a router to cut a dado, keep in mind that you’ll want to dial down the bit speed quite a bit and adjust the depth for more than one pass to keep from burning the bit or the wood.
Use a straight edge to guide the router, to ensure a straight path. Be advised that using a 3/4″ router bit will cut a dado slightly larger than a 3/4″ sheet of plywood (which is really 23/32″ thick). While 23/32″ bits are commercially available, using a 1/2″ bit and two passes would provide the desired results.
Points to Remember:
When cutting a dado, try to avoid cutting any deeper than 1/3 of the way through the stock receiving the dado, to keep from weakening the stock. For instance, when cutting a dado in a 3/4″ shelf standard, make your dado cut 1/4″ into the standard.
Also, there may be times when a dado shouldn’t be cut the entire length of the stock. In this event, it may be best to cut the dado on a router table.
Set the fence to the proper width and mark the start and stop points for cutting the dado on the fence with a pencil. Then, after starting the router, slide the stock over top of the head (keeping it against the fence) and ease it down onto the cutter. Slide the stock forward to the stop point, then back the stock up an inch or so before turning off the motor. Wait for the cutting head to stop spinning before lifting the stock off of the table.
Start Your Next Project With Teds’ Archive Of 16,000 Plans!
Instant access to all 16,000 woodworking plans with step-by-step details, photos, materials lists and more
Monthly free plans with lifetime membership access – No renewals, recurring fees or other charges
9. Rabbet
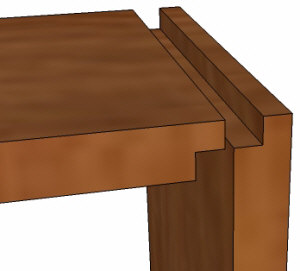
A rabbet is nothing more than a dado that is cut into the edge of the face of the stock rather than in the center of the stock. A rabbet is great for when a shelf needs to be placed flush with the top of the shelf standard or for placing a plywood back on a cabinet.
How to Cut a Rabbet:
As with a dado, the most common way to cut a rabbet is with a stacked dado head cutting set on a table saw. Traditionally, a sacraficial strip of wood is placed against the fence and then the sacraficial strip is placed against the dado set.
This method will prevent damage to the table saw’s fence. Another common method for cutting a rabbet is to use a router table with a straight cutting bit. Use a featherboard to hold the stock down to the table, which will insure a consistent cut.
10. Through Dovetail Joint
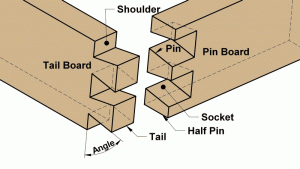
Of all woodworking joints, the through dovetail is revered for not only its strength, but also for its beauty. Dovetail joints can be challenging to fashion, but dovetailing jigs and routers have made this joint much easier to perfect.
The through dovetail is probably the most common dovetail joint used in drawer construction. However, there are many other types of joints that may be more appropriate in certain circumstances.
For instance, half-blind dovetails (where the sides of the tails are visible, but the ends are not) are used when the sides of the drawer must connect directly with the face of the drawer. Dovetails on drawers should only be visible when the drawer is opened, but be hidden when the drawer is closed.
Blind dovetails are common in cabinet or box construction where the pins and tails should be completely concealed. However, a portion of the end grain of the tail piece will be visible.
In the event that the woodworker wishes to hide the pins, tails and end grains, a mitered dovetail is the best choice. However, this is a very complicated joint, which takes a great deal of time and patience to master.
There are numerous other variations on the classic dovetail, including rabbeted through dovetails, mitered through dovetails, beveled dovetails and box joints (which are essentially dovetails with rectangular pins and tails).
Traditional Creation of Through Dovetails:
Before the advent of dovetailing jigs, through dovetails were cut by hand, and some woodworkers today still prefer the classic method.
The steps are relatively simple:
- Plane the ends of the two pieces of stock square.
- Mark the shoulder line of each piece, equal to the width of the adjoining piece of stock.
- Mark the ends of the tails at the desired angle.
- Cut the Tails with a Dovetailing saw.
- Remove the waste between the tails.
- Using the completed tails, mark the pins on the opposite board.
- Cut the pins and clean the waste.
Test the joint’s fit and trim more off of the pins if needed.
Using a Dovetailing Jig:
To cut through dovetails using a dovetailing jig, the order is virtually the same. Mark the depth of the cut on the tail board and insert it into the jig. Install an appropriate dovetailing bit into your router and cut the tails. Next, following the jig’s instructions, insert the pin board into the jig in the appropriate location, switch to a straight-cutting bit and cut the pins.
Obviously, the details for this process depend on the chosen jig. However, each dovetailing system includes a complete, step-by-step set of instructions for cutting through dovetails.
Assembly:
Dovetails should fit snugly, but not too snugly. Always dry-fit your dovetails before you get to the point of final assembly, to ensure your joint is perfect. When dry-fitting through dovetails, they should be a bit difficult to take apart, but not so difficult that you need a mallet to separate the parts.
When assembling your through dovetails, spread a thin, even layer of woodworking glue on all surfaces of either the tails or the pins before sliding the joint together. Use a rubber mallet or a sacrificial block of wood with a claw hammer to avoid marring the joint. Immediately wipe off any excess glue.
The Secret to Perfect Dovetails:
If there is one rule to follow, no matter which method you employ to cut your through dovetails, it is this: always cut the tails first, then cut the pins to fit the tails. It is much easier to take a bit more off of the pins to ensure that they fit the tails. However, if you cut the pins first, the tails are much more difficult to mark, increasing the likelihood of an imperfect dovetail joint.
11. Half-Blind Dovetail Joint
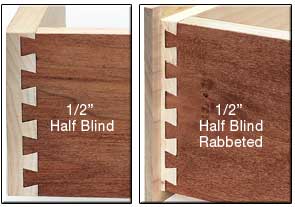
When connecting two pieces of wood, probably the most renowned joint is the through dovetail. The through dovetails is strong and beautiful, but there are instances where a through dovetail simply isn’t the most aesthetic choice.
For instance, when connecting sides of a drawer directly to the drawer front, one wouldn’t want to use a through dovetail joint, as the ends of the tails would show through the drawer front.
In this case, the best type of dovetail joint to use is the half blind dovetail.
What is a Half Blind Dovetail?
The half blind dovetail is exactly as the name denotes: half of the dovetail joint is visible, while the other half of the joint is hidden. This joint is nearly as strong as the through dovetail, but is used in instances such as the drawer front scenario described above.
Creating Half Blind Dovetails:
The traditional method of creating half blind dovetails doesn’t differ much from the method of creating through dovetails, but there are some points to keep in mind:
The section of the pin board that is not to be cut (thus forming the blind portion of the joint), is called the lap. The lap on the board should never be less than 1/8″ thick, yet should never exceed 1/3 of the pin board’s thickness, to ensure the strength of the dovetail joint.
Cutting half blind dovetails uses the following basic steps:
- Plane the ends of the two pieces of stock square.
- Mark the length of the tails, which is the width of the pin board minus the lap. Make a shoulder line at the appropriate length around the tail board.
- Mark the tails at the desired angle.
- Cut the tails with a Dovetailing saw
- Remove the waste between the tails using a bevel-edged chisel.
- Using the completed tails, mark the pins on the pin board, aligning the shoulder cuts with the side of the pin board opposite the lap.
- Cut the pins and clean the waste using a chisel..
Test the joint’s fit and trim more off of the pins if needed.
Using a Dovetailing Jig:
While nearly all router-based dovetail jigs can cut through dovetails, only certain systems have the ability to cut half blind dovetails. Keep this in mind when shopping for a dovetail jig system for your shop. The procedure for cutting half blind dovetails with a dovetail jig system is pretty much the same basic procedure.
Mark the depth of cut on the tail board based on the width of the pin board minus the lap. Insert the tail board into the jig and cut the tails using an appropriate dovetailing router bit. Then, following the jig’s instructions, mark and cut the half blind pins in the pin board.
Assembly:
Half blind dovetails should be assembled in precisely the same manner as through dovetails: dry fit the joints first to verify a proper fit, then disassemble, apply a thin, even layer of glue and assemble the joint. Use a rubber mallet to seat the joint if needed, and then immediately wipe off any excess glue that escapes the joint.
The Secret to Perfect Half Blind Dovetails:
Also as with through dovetails, the secret to half blind dovetails is to cut the tails, then mark the pins based on the tails. As noted above, never leave less than 1/8″ lap on the pin board, but not more than one-third the overall width of the pin board. Dry fit the joint after cutting the pins, and remove a bit more stock from the pins only if the fit is too tight.
12. Sliding Dovetail
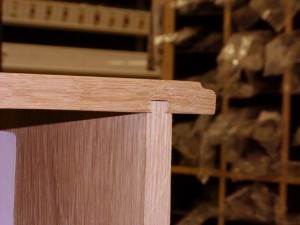
Of all dovetail joints, the sliding dovetail may be the least well-known, particularly among relative newcomers to woodworking. However, the sliding dovetail may be the most versatile of all dovetail joints. It is not only very useful for connecting two pieces of stock at a right-angle, as in a drawer or case, but can also be used to connect the parts of assemblies such as cabinet doors or cutting boards, attaching table legs to pedestals, joining shelves to cabinet cases and much more.
What is a Sliding Dovetail Joint?
A sliding dovetail joint is made by cutting a single tail down the length of a board’s edge, which is slid into a corresponding pin-shaped slot in the receiving piece of stock. In many cases, it is advisable to slightly taper the slot in the receiving piece, so that the joint is tighter towards the rear.
This will make the joint easier to slide at the beginning, but more difficult at the end, but will also help to keep the joint from separating later on.
How to Cut a Sliding Dovetail Joint:
Traditionally, a sliding dovetail was made by cutting the tail and slot by hand and cleaning up the components with a chisel. However, some modern dovetail jigs have the option for cutting sliding dovetails with a router and a dovetail bit. While this may eliminate some of the mystique of the joint, it certainly makes the task much easier to replicate, in addition to being a lot quicker.
If you have a dovetail jig that is able to cut a sliding dovetail joint, the steps for doing so should be clearly spelled out in the user guide that accompanied the dovetail jig.
13. Box Joint
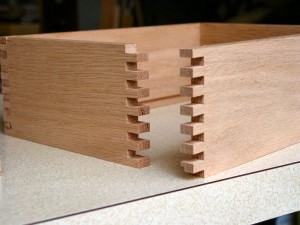
The dovetail joint is a classic, beautiful & strong method for connecting two pieces of stock. However, there are times where the dovetail wouldn’t be the best choice.
For instance, what if you need to connect two pieces of plywood as opposed to hardwood? Using dovetails to connect plywood would considerably increase the chances of delaminating the plywood when testing the joint while dry fitting.
What if you didn’t have access to a dovetail jig and a router?
Or perhaps you didn’t want to go to the trouble of hand-sawing dovetails? Is there another option other than dovetails to use in your woodworking projects?
Absolutely. A very simple alternative to the dovetail is called the box joint. As you can see from the image on the right, a box joint is very similar to a dovetail, with the difference being that the fingers in the box joint are rectangular rather than dovetail shaped.
There are a few ways to cut box joints. Of course, you could always do it with a dovetail saw and chisel. Simply pick a width for the fingers that will divide evenly into the width of the stock. In other words, if your stock is six inches wide, a half-inch wide finger would allow for twelve fingers total, six on each piece of stock.
Machining the Fingers:
If you don’t want to cut the fingers by hand, there are two ways to machine them. First, nearly all dovetail jigs can cut box joints. While you should check the documentation that accompanies your jig for the exact instructions, the setup is basically just like cutting the tails of a dovetail joint except that the bit would be a straight-cutting bit rather than a dovetail bit.
An even simpler method is to use a box joint jig on your table saw with a stacked dado set. Determine the width of each finger, then set up the stacked dado set to that width. Set the depth of cut to the same height as the thickness of the stock.
Next, attach a scrap piece of stock to your miter gauge.
The scrap should be wide enough so that, when attached to the miter gauge, it extends past the blade by at least an inch and at least two inches past the miter gauge on the left side.
Verify that the miter gauge with the attached piece of scrap stock is square to the blade, and then run the scrap through the saw.
Next, remove the scrap from the gauge and move it to the right twice the width of the fingers, and re-attach to the miter gauge. For instance, if the fingers (and consequently the stacked dado set) are 1/2-inch wide, you should move the scrap one inch to the right and re-attach it to the miter gauge.
Now, cut a small piece of stock that is the same width as the fingers that will fit into the cut you made in the scrap. However, this piece should be at least twice as long as the width of the workpieces. Attach this piece in the notch in the scrap with a wood screw from the bottom, positioned so that it protrudes forward from the scrap toward the saw blade. This will act as a gauge for cutting the fingers. Finally, verify that the miter is still square to the blade, and turn on the saw and cut a new notch in the scrap in its current position.
Cutting the Box Joint Fingers:
Now that you have the jig made, grab one of the workpieces and place it on end, firmly against the scrap and up against the little guide you attached to the notch in the scrap. Hold the stock tightly against the scrap piece and run it through the saw. Once it clears the blade, slide the entire assembly back through the blade, taking care to hold the work piece tightly against the scrap. You have just cut the first finger and notch, precisely at the proper width.
Now, with the gauge and work piece well clear of the blade, move the work piece to the right and slip the newly cut notch over the little guide piece. Hold the stock firmly against the scrap and cut the next notch in the same manner as you cut the first. Continue cutting notches until all of the fingers of the work piece have been formed.
The opposing work piece is cut in a similar manner, except that the first cut is not made with the stock up against the guide. Instead, the outside edge of this piece should be flush with the outside edge of the dado blade. This can be easily positioned by lining up the outside edge of the work piece with the edge of the notch in the scrap. Once it is lined up, make the first cut, then proceed using the guide as noted above.
Once all of the fingers on both sides of the joint have been formed, be sure to dry fit the joint. However, if you have built the jig properly, the joints should be perfect every time.
Assembly:
To assemble box joints, simply apply a thin layer of glue on all joint surfaces and slip the joint together and clamp as needed. This type of joinery works fine for making box-like structures such as drawers. However, you’ll need to be a bit more diligent about keeping the box square when clamping than you might need to with dovetails.
Even so, the box joint is a relatively strong and useful joint, one that can be a lot of fun to build. It is not as elegant as dovetails, but certainly very appropriate in some circumstances.
Start Your Next Project With Teds’ Archive Of 16,000 Plans!
Instant access to all 16,000 woodworking plans with step-by-step details, photos, materials lists and more
Monthly free plans with lifetime membership access – No renewals, recurring fees or other charges
