The pursuit of complete off-grid independence eventually leads to a harsh reality: generating your own electricity is a solved mathematical equation, but generating your own water is entirely dependent on your geography. If you are developing a homestead on a property without a deep aquifer, or you live in an environment where seasonal droughts dry up surface springs, securing a reliable water source becomes your most critical priority.
Enter Atmospheric Water Generation (AWG). The concept of a “DIY Air Fountain” that extracts pure, clean drinking water directly from the humidity in the air has exploded in popularity.
However, the internet is currently saturated with deceptive marketing campaigns selling “secret blueprints” that claim you can build a device for under $200 that generates 60 gallons of water a day. As developers and technical creators in the sustainable technology space, we must separate verifiable engineering from science fiction.
This definitive, master guide will strip away the myths. We will break down the actual thermodynamics of condensation, calculate the immense solar power required to run these systems, and provide a scientifically accurate, step-by-step blueprint for building a DIY Air Fountain optimized for high-humidity, tropical environments.
The Hard Physics of AWG
Before purchasing parts or stripping wires, you must understand exactly what an atmospheric water generator is: it is a modified, food-grade dehumidifier.
AWGs work by passing warm, humid air over a series of refrigerated evaporator coils. When the air temperature drops below its “dew point,” the air can no longer hold its moisture. The water vapor undergoes a phase change, condensing into liquid droplets on the coils, which then drip into a collection basin.
The Thermodynamic Reality Check
Condensing water from a gas to a liquid requires removing the latent heat of vaporization. This requires a massive amount of energy.
- The Power Draw: A standard 50-pint residential compressor draws approximately 600 watts of continuous power. Running this compressor 24 hours a day requires 14.4 kWh of energy daily.
- The Yield Limits: Even running perfectly at 600 watts all day, you will not generate 60 gallons. A heavily optimized, DIY compressor system running in ideal conditions will yield roughly 5 to 9 gallons of water per day.
If you attempt to build a DIY Air Fountain, you must be prepared to build a solar array capable of supporting that 14.4 kWh daily load. This requires a dedicated solar array of roughly 3,800 Watts just to power the water generator.
Want to build your own atmospheric water generator at home? If you want a step-by-step blueprint to pull clean drinking water straight out of the air—even in dry climates—you need a reliable, proven guide. The Water Freedom System is a complete, easy-to-follow DIY program that teaches you how to build a compact, low-cost home water generator using readily available materials. 👉 Stop worrying about dwindling well levels. Click here to check out the Water Freedom System and secure your independent water supply today!
Why Location Dictates Your Water Yield
Atmospheric water generation is highly climate-dependent. You cannot extract water from air that does not contain it. The metric that dictates your success is Absolute Humidity—the actual mass of water vapor present in a given volume of air.
If you are building this system in a high-humidity, tropical environment—such as the coastal regions of Bali or the humid creator hubs of Southeast Asia—you possess a distinct geographical advantage.
Expected Daily Yield Based on Climate
To set realistic expectations, we have modeled the estimated daily water yield of a standard 600W DIY compressor system across varying environmental conditions.
| Climate Profile | Temp (°C) | Relative Humidity (%) | Est. Daily Yield (Gallons) | Est. Daily Yield (Liters) |
|---|---|---|---|---|
| Arid / Desert | 20°C | 40% | ~2.0 Gallons | ~7.5 Liters |
| Temperate Spring | 20°C | 60% | ~3.0 Gallons | ~11.3 Liters |
| Warm Summer | 25°C | 60% | ~4.0 Gallons | ~15.1 Liters |
| Humid Subtropical | 30°C | 60% | ~5.3 Gallons | ~20.0 Liters |
| Tropical / Monsoon | 30°C | 80% | ~7.0 Gallons | ~26.5 Liters |
| Equatorial Jungle | 35°C | 80% | ~9.2 Gallons | ~34.8 Liters |
As the data shows, deploying a DIY Air Fountain in a tropical climate (30°C at 80% humidity) allows you to harvest over three times as much water as you would in a dry, temperate zone.
The Required Materials & Core Components
Building a safe, functional DIY Air Fountain requires merging refrigeration mechanics with food-safe plumbing. Because standard dehumidifiers are designed to remove moisture from basements (not to provide drinking water), their internal components are coated in toxic anti-corrosives and harbor heavy metals. You must modify the core components strictly for human consumption.
The Hardware Inventory
- The Compressor Core: A high-capacity (50-pint to 70-pint) mechanical dehumidifier. (Avoid desiccant wheel models; you need a refrigerant compressor).
- Food-Safe Evaporator Coating: FDA-approved, non-toxic epoxy or silicone conformal coating to seal the copper and aluminum coils.
- Air Filtration: High-efficiency MERV-13 or HEPA intake filters. (If you condense dirty air, you condense dirty water).
- Water Storage: Opaque, BPA-free HDPE water reservoir (5 to 10 gallons) with a gravity spigot.
- Water Purification:
- Submersible 12V UV-C sterilizer bulb.
- Inline remineralization cartridge.
- Gravity-fed carbon block filter (e.g., Berkey or Alexapure elements).
- Sensors: An inline TDS (Total Dissolved Solids) meter and an ambient hygrometer.
Step-by-Step Construction Guide
Transforming a commercial compressor into a safe, off-grid water generator requires methodical disassembly, toxic mitigation, and sanitary plumbing integration.
1. Harvest the Compressor Core: Prerequisite.
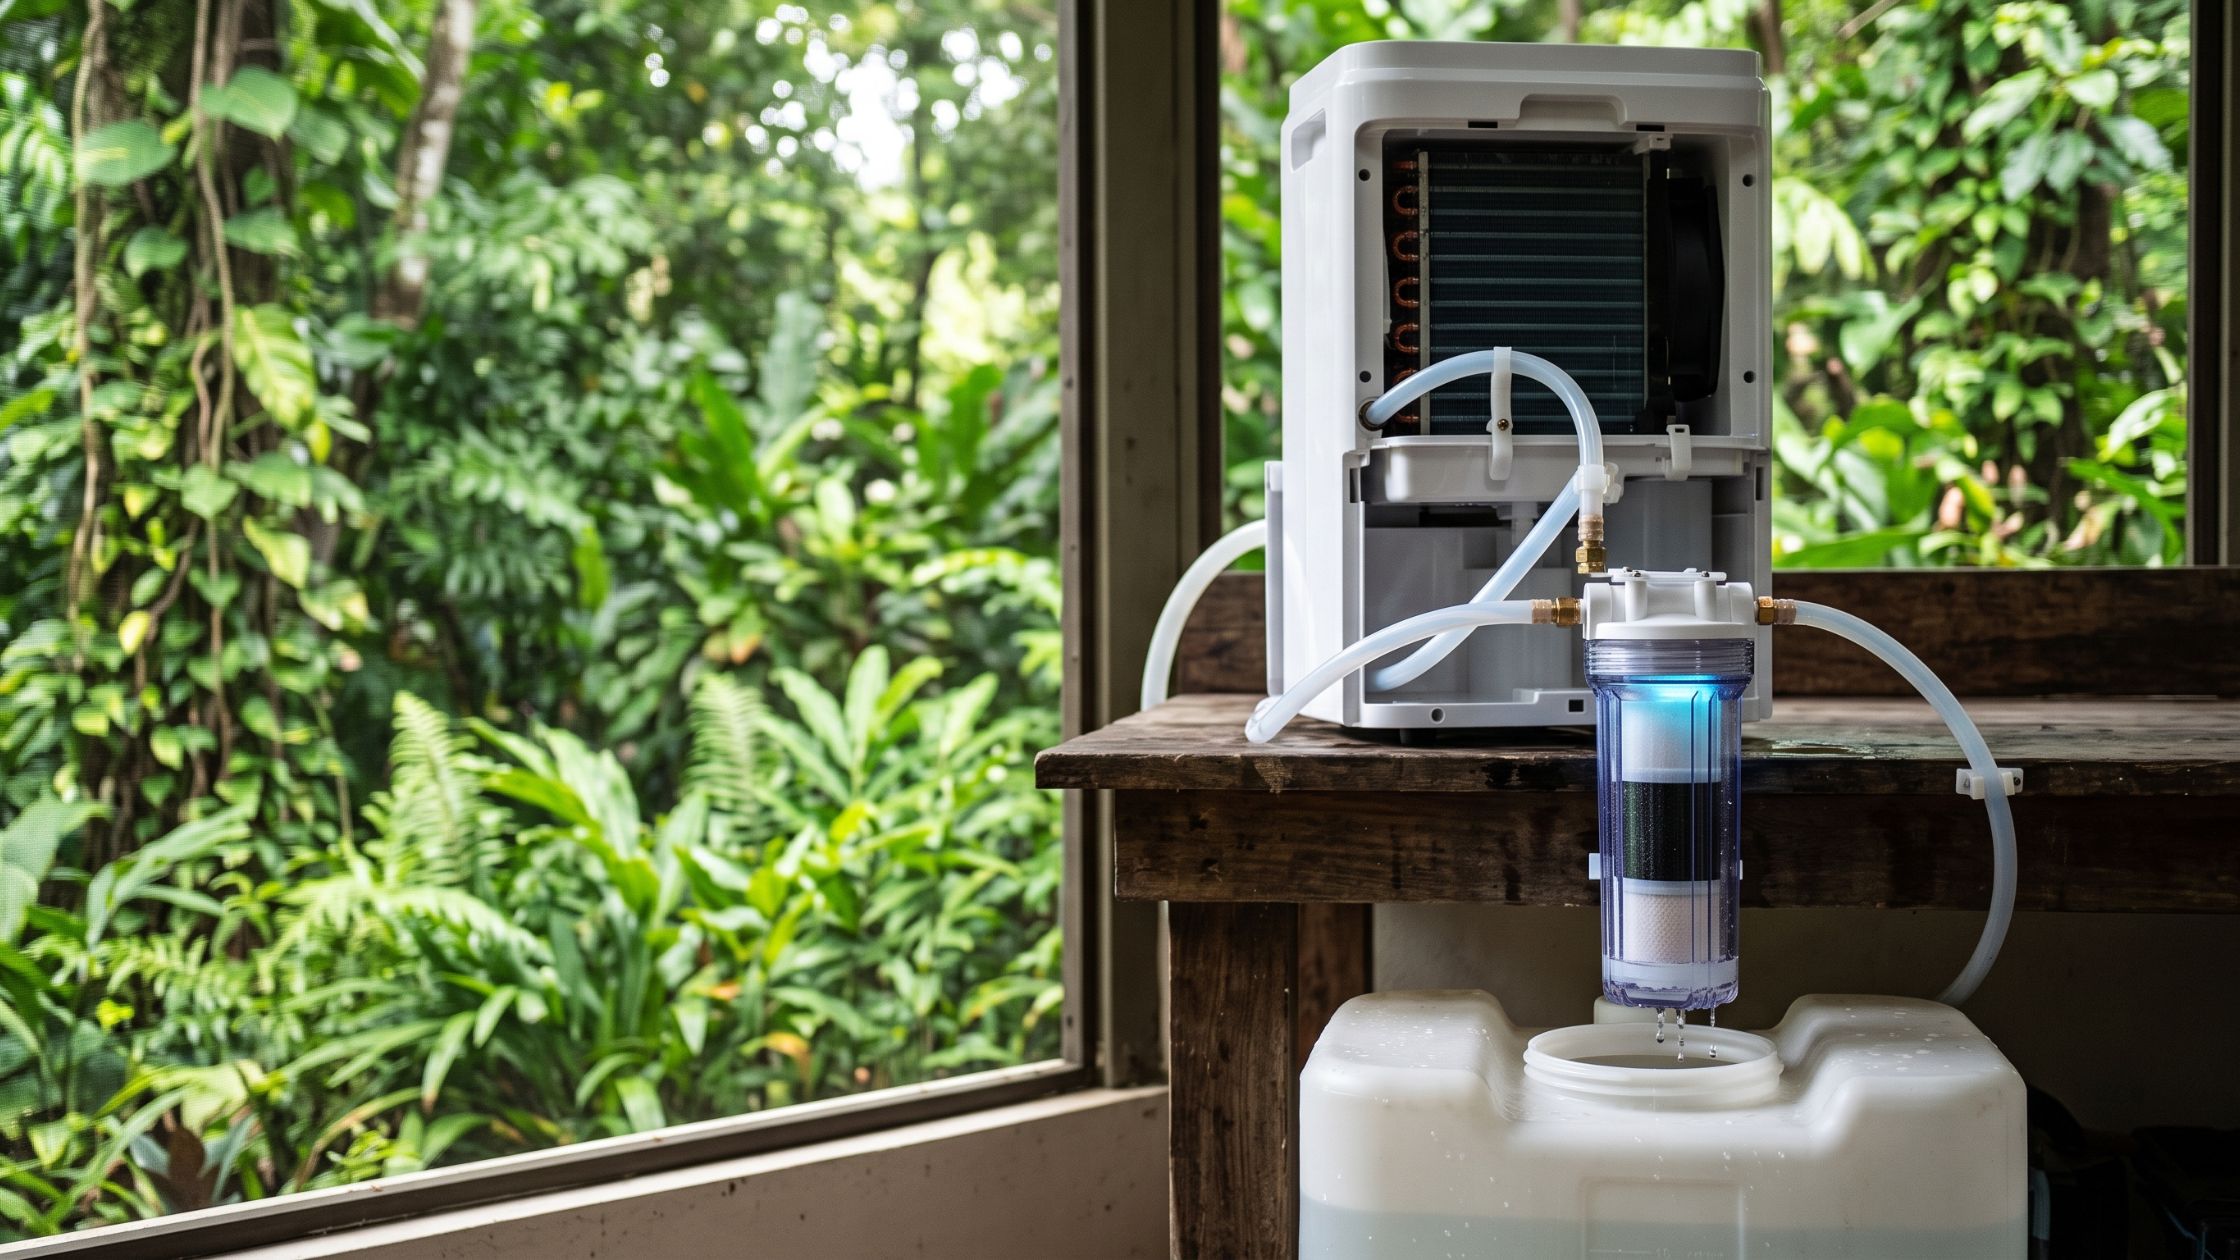
Remove the outer plastic casing of the dehumidifier using a standard Phillips screwdriver. Disconnect and remove the factory water collection bucket, the mechanical float switch (which tells the machine to turn off when full), and the factory drain hose. You should be left with the bare metal chassis exposing the compressor, the front-facing evaporator coils (cold), and the rear-facing condenser coils (hot).
2. Bypass the Float Switch: Electrical Modification.
Because you are routing the water to an external, larger reservoir, the machine must run continuously. Locate the two wires leading to the mechanical float switch you removed. Strip the ends of these two wires, twist them together, and seal them with an electrical wire nut and heat-shrink tubing. This permanently closes the circuit, tricking the motherboard into thinking the internal tank is always empty.
3. Seal the Evaporator Coils: Toxicity Mitigation.
Standard aluminum fins and copper tubes will leach heavy metals into your drinking water and oxidize rapidly. You must encapsulate them. Using an FDA-approved, food-safe silicone conformal spray coating, apply three light, even coats across the entire surface of the front evaporator coils. Allow 24 hours of curing time between each coat. Ensure you do not bend or crush the delicate aluminum fins during application.
4. Construct the Sanitary Drip Pan: Plumbing.
The factory drip pan is often made of non-food-grade plastic prone to bacterial biofilm buildup. Line the existing drip pan with a custom-cut sheet of food-grade stainless steel or a heavy-duty, BPA-free silicone mat. Drill a new drain hole through your lining to match the factory exit port, and secure a food-safe silicone tube to the exit port using a stainless steel hose clamp.
5. Upgrade the Intake Air Filtration: Air Quality Control.
The water you generate is only as clean as the air passing over the coils. Discard the cheap factory mesh filter. Measure the intake vent dimensions and cut a high-efficiency MERV-13 pleated air filter to fit tightly over the intake. Secure it using aluminum foil tape to ensure zero air bypasses the filter. This prevents dust, pet dander, and airborne mold spores from entering the condensation chamber.
6. Integrate the UV-C Sterilization Reservoir: Biological Safety.
Route your food-safe silicone drain tube downward into your opaque HDPE storage reservoir. Inside the reservoir, mount a submersible 12V UV-C sterilization lamp. Stagnant, room-temperature water is a breeding ground for bacteria. The UV-C light must run continuously to scramble the DNA of any biological contaminants that manage to pass through the condensation phase.
Want to build your own atmospheric water generator at home? If you want a step-by-step blueprint to pull clean drinking water straight out of the air—even in dry climates—you need a reliable, proven guide. The Water Freedom System is a complete, easy-to-follow DIY program that teaches you how to build a compact, low-cost home water generator using readily available materials. 👉 Stop worrying about dwindling well levels. Click here to check out the Water Freedom System and secure your independent water supply today!
The Critical Final Phase: Filtration and Remineralization
When your DIY Air Fountain condenses water from the air, the resulting liquid is technically distilled water.
While distilled water is free of heavy metals and ground pollutants, it is also completely devoid of essential minerals like calcium, magnesium, and potassium. Drinking demineralized water long-term is dangerous; it is highly aggressive and will actually leach vital minerals out of your bones and teeth to achieve osmotic balance in your body. Furthermore, condensed water tastes incredibly “flat” and metallic.
To make your generated water safe and pleasant for long-term human consumption, it must pass through two final stages before reaching your glass.
Stage 1: The Carbon Polish
Install a gravity-fed carbon block filter at the bottom of your HDPE reservoir. As the UV-sterilized water drips through the dense carbon block, any Volatile Organic Compounds (VOCs) that were present in the air and dissolved into the water (such as volatile exhaust fumes or aerosol pollutants) will be trapped in the microscopic carbon pores.
Stage 2: Inline Remineralization
Attach an inline remineralization cartridge to the output spigot of your carbon filter. These cartridges are packed with crushed calcite, coralline sand, and magnesium compounds. As the aggressive, acidic distilled water flows through the cartridge, it naturally dissolves trace amounts of these alkaline minerals.
This process restores the pH balance of the water to a healthy 7.2 to 7.5 range and gives it a crisp, refreshing taste identical to natural spring water.
Sizing the Solar Array for Your Air Fountain
As established in our initial thermodynamic calculations, running a 600W continuous load requires a dedicated and robust off-grid solar infrastructure. Do not attempt to plug a DIY Air Fountain into a small, portable camping battery; you will drain it in under an hour.
If you are incorporating this water generator into an existing off-grid homestead, you must expand your current electrical footprint to accommodate it.
The Math for Total Autonomy:
- Daily Load: 600W x 24 hours = 14,400 Watt-hours (14.4 kWh/day).
- Inverter Losses: Accounting for a 15% loss when converting your battery’s DC power to the 120V/240V AC power required by the compressor, your true daily load is 16.5 kWh.
- Solar Array Sizing: Assuming an average of 4.5 peak sun hours in a tropical environment, you need an array capable of generating 16.5 kWh in that narrow window.
- 16,500 Wh / 4.5 hours = 3,666 Watts.
- Adding a 20% safety margin for overcast days, you need 4,400 Watts of dedicated solar panels (approximately eleven 400W Tier-1 monocrystalline panels).
- Battery Storage Sizing: To keep the compressor running through the night, you need a minimum of 20 kWh of LiFePO4 battery storage dedicated solely to the water generation circuit.
For a complete breakdown of calculating solar loads and wiring these components safely, reference our master DIY Solar Panel Installation: Step-by-Step Home Guide.
Ongoing Maintenance and Biological Audits
Unlike a passive solar panel, an Atmospheric Water Generator is an active mechanical and biological environment. Neglecting maintenance will result in mechanical failure or, worse, contaminated drinking water.
The Maintenance Schedule
- Weekly Intake Audit: Inspect the MERV-13 air filter. In high-dust environments or pollen seasons, this filter will clog rapidly. A clogged filter chokes the airflow, causing the evaporator coils to freeze over into a solid block of ice, halting all water production. Vacuum the filter weekly and replace it monthly.
- Monthly Reservoir Scrub: Empty the HDPE storage tank completely. Scrub the interior walls with a solution of 1 part food-grade hydrogen peroxide to 4 parts water. This eliminates any biofilm that may be developing outside the direct line of sight of the UV-C lamp.
- Quarterly Coil Check: Unplug the unit and inspect the coated evaporator coils. If you see dust bypassing your intake filter and sticking to the wet coils, use a soft nylon brush and a spray bottle of distilled water to gently flush the fins clean.
- Bi-Annual Filter Replacement: Replace the UV-C bulb (they lose their sterilizing intensity after 6 months of continuous use), the carbon block filter, and the remineralization cartridge.
Conclusion: The Reality of Water Independence
Building a DIY Air Fountain is not a cheap, magical shortcut to infinite water. It is a serious, thermodynamic engineering project that trades electrical energy for atmospheric moisture.
If you are willing to invest in the necessary solar infrastructure, adhere to strict food-safe material protocols, and commit to rigorous biological maintenance, an AWG is an incredibly powerful tool. For off-grid properties located in humid, tropical environments, extracting water from thin air is not just a scientific novelty—it is a proven, viable method for achieving ultimate homestead resilience.
Want to build your own atmospheric water generator at home? If you want a step-by-step blueprint to pull clean drinking water straight out of the air—even in dry climates—you need a reliable, proven guide. The Water Freedom System is a complete, easy-to-follow DIY program that teaches you how to build a compact, low-cost home water generator using readily available materials. 👉 Stop worrying about dwindling well levels. Click here to check out the Water Freedom System and secure your independent water supply today!