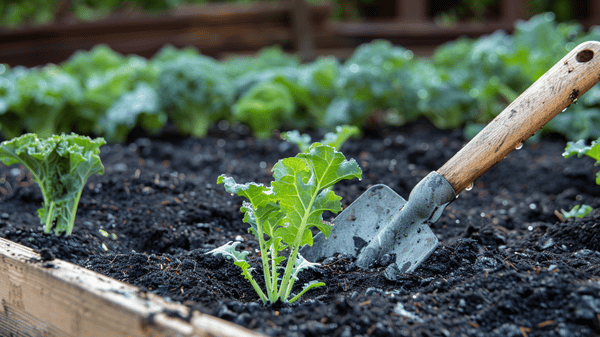
To compost effectively for your garden, employ hot composting techniques by balancing carbon-rich browns and nitrogen-rich greens in a 2:1 ratio, maintaining temperatures between 55-65°C, and aerating every two days. Alternatively, consider cold composting by layering materials and selecting a moisture-retentive location, which requires less maintenance but takes longer to decompose.
Vermicomposting can enhance efficiency using specific worm species, while direct composting involves burying organic waste in your garden to improve soil health. Each method necessitates monitoring moisture and aeration to prevent issues, and further examination will provide additional insights into optimizing these techniques.
Hot Composting Techniques
When starting your hot composting journey, understanding the essential techniques can make all the difference. For effective hot composting, maintaining a proper balance between browns and greens is fundamental, aiming for a ratio of approximately 1:1:2/3.
In addition, you should actively engage in temperature monitoring, ensuring that your compost pile reaches and sustains temperatures between 55-65°C (131-149°F), which encourages the growth of beneficial thermophilic microorganisms critical for rapid decomposition.
Notably, the process can be highly engaging as it showcases effective decomposition dynamics in your compost pile. Aeration practices play an important role in the process; regularly turning your compost every two days—starting after the initial four days—will facilitate adequate oxygen circulation, preventing anaerobic conditions that can stifle microbial activity.
It’s also important to manage moisture levels by keeping the pile damp enough that, when squeezed, only a single drop of water emerges. Moreover, maintaining a suitable pile size of around 1 cubic meter (35 cubic feet) will help generate the necessary heat for effective composting.
Cold Composting Methods
Cold composting offers low maintenance and simplicity, you can enjoy the process of recycling organic waste without much fuss. Typically taking between six months to a year, this method involves layering both green (nitrogen-rich) and brown (carbon-rich) cold composting materials.
To set up your cold compost system, choose a location that remains moist but is shielded from direct sunlight. You can use a simple bin made of chicken wire or purchased materials, ensuring that the bottom is bare ground for accessing beneficial bacteria.
Start with a base of leaves or grass clippings and break larger items into smaller pieces for faster decomposition. Keep the pile moist and add larger debris for aeration without requiring regular turning, which makes maintenance a breeze.
After several months, you’ll find that the compost is ready for use, enhancing your garden, as you apply it to improve soil health and suppress weeds, creating a thriving ecosystem.
Vermicomposting Basics
To successfully start vermicomposting, you need to take into account several key components, including selecting the appropriate worm species and establishing a functional bin setup essential for their well-being.
Proper maintenance of the system is critical, as it guarantees an ideal environment for the worms while preventing common issues that may arise during the composting process.
Moreover, understanding the interaction between worms and microbes in natural environments is vital for enhancing the decomposition process and achieving nutrient-rich compost.
Worm Types Selection
Selecting the right worms for your vermicomposting system is vital for maximizing efficiency and productivity. The worm species you choose greatly impacts the compost benefits you reap.
Red Wigglers (Eisenia fetida) are the most commonly used, capable of consuming half their body weight daily, producing high-quality castings, and reproducing rapidly in warm, humid conditions.
On the other hand, European Nightcrawlers (Eisenia hortensis) serve dual purposes as composters and fishing bait; they’re low maintenance and thrive in broader environmental conditions. Additionally, these worms significantly enhance soil fertility, which is essential for healthy plant growth.
If you live in a tropical area, African Nightcrawlers (Eudrilus eugeniae) may work for you, although they require moist conditions and struggle in cooler temperatures.
Blue Worms (Perionyx excavatus) and Alabama Jumpers (Amynthas gracilis) are also viable options, particularly in warmer regions.
Always remember that regular soil worms won’t thrive in composting systems; therefore, choosing specialized vermicomposting worms is important. Accurate species identification is significant, so consider purchasing from reliable suppliers.
Bin Setup Essentials
Setting up a vermicomposting bin is crucial for creating an efficient and productive composting environment. Begin by selecting suitable bin materials and guaranteeing adequate airflow considerations to keep your worms healthy. To enhance success, follow these steps:
- Choose the Right Bin: Opt for a non-transparent heavy-duty plastic bin or a wooden box lined with plastic, measuring approximately 16″ x 24″ x 8″, or consider larger options (20-55 gallons) if desired.
- Ventilation Setup: Drill small holes near the top of the bin for airflow, avoiding drainage holes at the bottom, which can lead to excess moisture and hinder composting.
- Prepare Bedding: Fill the bin about 1/4 full with lightly moistened bedding materials, such as shredded newspaper, coco coir, or dry leaves, mixing thoroughly to guarantee an ideal environment. Adding approximately 2-4 cups of soil will help introduce beneficial microorganisms that aid in digestion.
After the initial setup, allow the bin to rest for one week before introducing your worms, enabling beneficial microbial activity.
Remember to monitor temperature and moisture levels regularly, providing a conducive space for your composting community. With dedication and care, you truly belong to the rewarding world of vermicomposting.
Maintenance and Troubleshooting
Maintaining a healthy vermicomposting system is essential for productive composting, and it’s simpler than you might think. Start by choosing red wigglers, as they excel at breaking down organic matter.
Your feeding schedule should involve offering small portions of kitchen scraps, lawn clippings, and other organic materials, while steering clear of citrus, meat, and dairy, which can be harmful. Regularly check your bin to observe worm habits; this helps you monitor for uneaten food and guarantees your worms thrive.
To keep conditions ideal, maintain high moisture levels and low temperatures, as heat buildup can adversely affect decomposition and worm health. Use shredded paper, cardboard, or coconut coir as bedding to retain moisture and promote aeration; worms will naturally aerate your compost without needing manual intervention.
If you encounter issues such as odors or pests, double-check for excess moisture or inappropriate feed items. When harvesting, expose the compost to sunlight, encouraging worms to burrow deeper, allowing you to easily remove the top layer.
Direct Composting Advantages
Direct composting offers a simple implementation process that allows you to integrate organic waste directly into your soil without the need for extensive setup or equipment.
Furthermore, this method enhances soil biodiversity by encouraging diverse microbial populations, which play an essential role in breaking down organic materials and facilitating nutrient uptake for your plants.
Simple Implementation Process
Composting can be a straightforward and rewarding process, especially with direct composting. This method allows you to efficiently recycle organic waste right in your garden, making it an excellent practice for sustainable living.
Here are three easy garden tips to get you started:
- Dig Holes: Create 8-12 inch deep holes or trenches in your garden; this is where you’ll bury your organic waste, such as fruit scraps, eggshells, and coffee grounds.
- Rotate Areas: Regularly change the spots where you bury your waste to guarantee nutrients are distributed evenly throughout the soil.
- Timing: Perform this composting process before planting or in between plantings to give time for decomposition.
With minimal equipment and maintenance, direct composting fits well into small garden spaces. It effectively attracts worms, which enrich the soil through their natural aeration.
By adopting these simple implementation steps, you not only contribute to a healthier garden but also reduce household waste, cultivate richer soil, and support a sustainable ecosystem. Embrace these direct composting techniques, and enjoy the immediate benefits for both you and your plants.
Enhances Soil Biodiversity
Embracing direct composting not only enriches your garden but also enhances soil biodiversity substantially. When you incorporate compost into your soil, it promotes diverse microbial communities that play an essential role in supporting soil organisms critical for plant health and nutrition.
This complex web of microorganisms actively participates in nutrient cycling, breaking down organic matter, and making vital nutrients readily available to your plants.
Furthermore, an increase in soil biodiversity can greatly improve soil structure, allowing for better root development and enhancing water retention. This means fewer resources are needed for irrigation, as composted soil holds moisture much more effectively.
Additionally, the presence of earthworms and beneficial microbes naturally controls pests, reducing your reliance on synthetic pesticides and fertilizers.
Sheet or Lasagne Composting
When it comes to nurturing your garden while managing waste, sheet or lasagna composting offers a practical and efficient solution. This method utilizes layered techniques, allowing you to create a robust compost system that holds nutrients and reduces garden maintenance.
Here’s how to get started with your lasagna composting:
- Layering Materials: Begin with a bottom layer of cardboard or newspaper to smother weeds, followed by alternating layers of brown (carbon-rich) materials like leaves and straw, and green (nitrogen-rich) materials such as kitchen scraps. Remember, the brown layers should be two to three times thicker than the green.
- Moisture Management: Verify the bottom layer is watered to encourage decomposition. Monitor the moisture levels throughout, making sure the pile isn’t too dry or overly wet.
- Pest Control: Including sufficient brown layers can deter pests by filtering food odors.
Over time, the layers should decompose into a rich compost, ready for your garden. While the process may be slow, the benefits of creating a nutrient-rich growing environment and reducing waste make it worthwhile.
Essential Composting Ingredients
To create nutrient-rich compost, you need the right blend of ingredients that provide essential nutrients for your garden. Start by incorporating carbon-rich materials, often referred to as “browns,” which include dry leaves, twigs, shredded newspaper, wood chips, and straw.
These elements not only absorb excess moisture but also facilitate air circulation within the pile, promoting a healthy decomposition process.
Next, add nitrogen-rich materials, or “greens,” such as fruit and vegetable scraps, grass clippings, coffee grounds, crushed eggshells, and organic manure from herbivores. These ingredients break down quickly and contribute substantially to the nutrient balance in your compost.
To refute common composting myths, you must remember that achieving the right ratio is essential; aim for two to three parts browns to one part greens. Don’t overlook the necessity of water and air—both are critical to microbial activity and overall compost health. To maintain effective nutrient balancing, layer your materials like lasagna, ensuring proper absorption and aeration throughout the compost pile.
Effective Composting Techniques
You can effectively compost by using various techniques tailored to your space and needs. Understanding effective composting methods debunks common composting myths and highlights the composting benefits you’ll reap for your garden.
Here are three popular techniques to contemplate:
- Hot Composting: This method relies on microbial activity and heat to decompose materials quickly. Regularly turning the pile guarantees aeration and maintains temperature, optimizing decomposition while minimizing odors and pest issues.
- In-Ground Composting: By burying organic waste directly in the soil, you create a natural decomposition environment. This technique effectively reduces odors and pests, although it may take longer for materials to break down completely.
- Enclosed Composting Systems: Utilizing tumblers or rotating containers allows for easy mixing and aeration that speeds up decomposition. These setups are ideal for small spaces, producing usable compost within weeks while minimizing common composting issues.
Ultimately, the choice of technique depends on your available space and waste types. Exploring these methods can enrich your gardening experience while effectively managing organic waste, making you feel more connected to your gardening community.
Using Your Compost
Utilizing compost effectively can transform your garden into a thriving ecosystem. To maximize your compost applications, start by mixing a 4″ to 8″ layer into your new edible garden beds, improving soil enhancement considerably.
For new vegetable beds, add 3-4 inches of compost, while 1/4 to 1 inch suffices for existing beds. Employ a digging fork or spade to incorporate the compost into the top 8–12 inches of soil; this practice not only enriches the soil but also decreases compaction, promoting better air circulation.
Topdressing your garden with a 1/2″ to 2″ layer of compost at least once a year further improves soil fertility and reduces watering needs. The ideal times for topdressing are late spring and early fall.
Consider using sifted, weed-seed-free compost for lawns, while worm compost can be sprinkled at the base of plants in a 1/4″ to 1″ layer, enhancing the nutrient profile and overall soil health. For container and potting mixes, limit worm compost to 20% for best results, and always sift your compost to guarantee uniform consistency.
Overcoming Composting Challenges
While composting can be a rewarding process, it often comes with its own set of challenges that can hinder your success. To combat common issues like compost odor and pest management, it’s vital to adopt specific strategies that optimize your composting experience.
Here are three essential tips to overcome these challenges:
- Balance Your Browns and Greens: Confirm you include a mix of brown materials (like leaves or cardboard) and green materials (such as kitchen scraps). Too many greens without sufficient browns can lead to foul odors.
- Manage Moisture Levels: Too much moisture can create anaerobic conditions, while too little can halt decomposition. Regularly turning the compost pile, adding dry materials to wet piles, or introducing water to dry piles can help maintain balance.
- Pest Prevention: Regular pile turning and confirming no food waste is exposed deters pests. Cover your compost with a layer of soil or finished compost and use only plant-based materials to reduce attraction.
Related Post: Composting 101: A Beginner’s Guide to Soil Enrichment.
Conclusion
To summarize, by embracing various composting methods, you cultivate not only a thriving garden but also a sustainable ecosystem. Each technique, symbolizing the interconnectedness of nature and human effort, contributes to nutrient-rich soil that fosters growth.
As you navigate through the challenges of composting, remember that patience and perseverance are key to transforming organic waste into a valuable resource, ultimately enhancing your garden’s health and reinforcing your commitment to environmental stewardship.