Did you know that solar panels can save you up to 50% on your energy bills? With the increasing demand for sustainable energy solutions, many people are turning to solar panels as a cost-effective and environmentally friendly option. However, the process of installing and maintaining solar panels can be complex and overwhelming.
In this comprehensive guide, we will walk you through the step-by-step process of installing and maintaining solar panels, ensuring that you have all the knowledge and tools necessary to harness the power of the sun and contribute to a greener future.
A New Dimension for Solar Energy Can Slash Your Power Bills by 65%
>>> WATCH TO SEE HOW IT WORKS <<<
Key Takeaways
- Solar panels offer numerous benefits such as saving up to 50% on energy bills and contributing to a greener future.
- The installation process involves various steps including location assessment, groundwork preparation, and choosing the right equipment.
- Before installation, a roof space assessment and structural inspection are necessary to ensure suitability and explore alternative options.
- Connecting solar panels to the inverter and establishing the wiring system requires following manufacturer’s instructions, ensuring compatibility, and adhering to safety precautions.
Preparing for Installation
This discussion will explore the key points of location assessment and groundwork preparation in the process of installing and maintaining solar panels.
Location assessment involves evaluating various factors such as sunlight exposure, shading, and structural suitability to determine the optimal placement of solar panels.
Groundwork preparation includes tasks such as site inspection, soil analysis, and foundation construction to ensure a solid and stable base for the solar panel installation.
Location Assessment
Considerations to be made when assessing the location for solar panel installation include:
- Identifying an ideal site with unobstructed sunlight, sufficient space for mounting structures, and accessible pathways. These factors play a crucial role in determining the efficiency of solar panels.
- Shading analysis is essential to identify potential obstructions that may cast shadows on the panels, reducing their overall output.
- Furthermore, the orientation of the solar panels is essential to maximize sunlight exposure. Panels should ideally face the equator to capture the maximum amount of sunlight throughout the day.
- Additionally, the tilt angle of the panels should be optimized based on the latitude of the installation site to ensure optimal energy absorption.
- Lastly, regular cleaning of the solar panels is necessary to remove dirt, dust, and debris that can obstruct sunlight and reduce efficiency.
Groundwork Preparation
To ensure a stable and safe installation, an important aspect of the solar panel project is the preparation of the groundwork. Site preparation involves inspecting footing locations and reinforcing foundations if necessary.
Additionally, the excavation process involves digging trenches for electrical connections and mapping the wiring system. Soil testing is crucial to assess the soil’s composition and determine if any adjustments are required.
Ground leveling is also essential to ensure a flat and even surface for the solar panel installation. Moreover, a proper drainage system needs to be implemented to prevent water accumulation and potential damage to the panels.
By paying attention to these crucial aspects of groundwork preparation, the solar panel installation can be done efficiently and effectively, providing a stable and safe foundation for the solar energy system.
Choosing the Right Equipment
This discussion will focus on the important aspects of choosing the right equipment for solar panel installation.
Researching solar panels involves gathering information on the different types, technologies, and brands available in the market. It is important to ensure that the panels chosen are of high quality and suitable for the specific installation requirements.
Calculating solar power needs involves assessing the energy consumption and determining the size and number of solar panels required to meet the electricity demands. This step is crucial in ensuring that the solar system can generate enough power to meet the needs of the household or business.
Making an informed decision entails considering factors such as efficiency, durability, warranties, and cost-effectiveness. By carefully evaluating these factors, one can select the most suitable solar panels for the installation. It is important to weigh the pros and cons of different options to make an informed and educated decision.
Researching Solar Panels
When researching solar panels, it is essential to evaluate the cost, reviews, prices, warranties, and efficiency ratings offered by different vendors. To make an informed decision, consider the following:
- Research methods: Utilize online resources, industry publications, and forums to gather information about various solar panels.
- Solar panel efficiency: Look for panels with high efficiency ratings, as they will generate more electricity for your needs.
- Cost analysis: Compare the upfront costs, maintenance expenses, and potential savings over the long term to determine the overall cost-effectiveness.
- Government incentives: Check if there are any federal or state incentives available, such as tax credits or rebates, which can significantly reduce the initial investment.
- Environmental impact: Consider the environmental benefits of installing solar panels, such as reducing carbon emissions and dependence on fossil fuels.
By thoroughly researching these factors, you can choose the right solar panels that meet your needs, provide a good return on investment, and contribute to a cleaner and more sustainable future.
Calculating Solar Power Needs
In the previous subtopic, we discussed the importance of researching solar panels before making a purchase. Now, we will delve into the process of calculating solar power needs. This step is crucial in ensuring the appropriate system size and avoiding under or over-sizing the system.
By accurately calculating energy consumption and considering factors such as solar panel efficiency and solar power generation, we can determine the optimal size of the solar panel system. Additionally, it is essential to account for solar power storage and the utilization of renewable energy sources.
To assist in this calculation, a table can be used to organize and analyze the data, considering variables such as daily energy consumption, peak sun hours, and solar panel efficiency. By following this comprehensive guide, individuals can install and maintain solar panels that effectively meet their energy needs while harnessing the benefits of renewable energy sources.
| Factors to Consider | Description |
|---|---|
| Daily Energy Consumption | Measure of the total energy consumed in a day |
| Peak Sun Hours | Number of hours of optimal sunlight available for solar power generation |
| Solar Panel Efficiency | Measure of how effectively solar panels convert sunlight into electricity |
| Solar Power Generation | Amount of electricity generated by solar panels |
| Renewable Energy Sources | Alternative sources of energy that are sustainable and have minimal environmental impact |
Making an Informed Decision
To make an informed decision about solar power systems, careful consideration of various factors such as energy consumption, solar panel efficiency, and renewable energy sources is necessary.
When weighing options, it is essential to conduct a cost analysis to determine the financial feasibility of installing solar panels. This analysis should include the initial installation costs, maintenance expenses, and potential energy savings over time.
Additionally, one must consider the environmental impact of solar panels, as they produce clean and renewable energy, reducing greenhouse gas emissions and dependence on fossil fuels.
Solar panels are a long-term investment, and their benefits extend beyond energy savings. They can increase the value of a property and provide a sense of contributing to a sustainable future.
Therefore, understanding these factors is crucial in making an informed decision about installing and maintaining solar panels.
Setting Up the Solar Panel System
This discussion will focus on three key points related to setting up a solar panel system: considering roof space and structural integrity, choosing the mounting system, and connecting solar panels to the inverter.
When determining the feasibility of installing solar panels, it is important to assess the available roof space and ensure that it can accommodate the desired number of panels. Additionally, the structural integrity of the roof must be evaluated to ensure it can support the weight of the panels and withstand any potential wind or snow loads.
The choice of mounting system is crucial as it determines the angle at which the panels are installed and affects their efficiency.
Finally, connecting solar panels to the inverter is a critical step that requires proper wiring and electrical connections to ensure optimal performance and safety.
Considering Roof Space and Structural Integrity
Considering the roof space and maintaining the structural integrity of the building are crucial factors when assessing the feasibility of installing solar panels.
To ensure a successful solar panel installation, it is important to conduct a thorough roof space assessment and structural inspection. This involves evaluating the available roof area and determining its load bearing capacity to support the weight of the solar panels. Potential obstacles such as chimneys, vents, or skylights should also be taken into account during the assessment.
If roof space is limited or unsuitable, alternative installation options such as ground-mounted systems can be considered. These systems are installed on the ground using frames or poles, allowing for flexibility in panel placement and orientation. Ground-mounted systems are particularly suitable for properties with ample land space or when roof space is insufficient to accommodate solar panels.
Choosing the Mounting System
One important factor to consider when selecting a mounting system for solar panels is the weight and sunlight exposure requirements. There are several mounting options available, each with its own suitability based on these factors. The table below provides a comparison of the different mounting systems:
| Mounting System | Tilt Angle | Weight Considerations | Wind Resistance | Maintenance Requirements |
|---|---|---|---|---|
| Roof-mounted | Adjustable | Light to moderate | May require additional support in high-wind areas | Limited maintenance required |
| Ground-mounted | Adjustable | Heavy | Highly resistant to wind forces | Regular maintenance required |
| Pole-mounted | Adjustable | Moderate to heavy | Highly resistant to wind forces | Regular maintenance required |
When selecting the most appropriate mounting system, it is important to consider the weight of the solar panels and any additional equipment, as well as the amount of sunlight exposure the panels will receive. Additionally, the tilt angle of the mounting system should be adjustable to optimize the panels’ performance.
Wind resistance should also be taken into account, especially in areas prone to high winds. Finally, the maintenance requirements of the mounting system should be considered to ensure the longevity and efficiency of the solar panels.
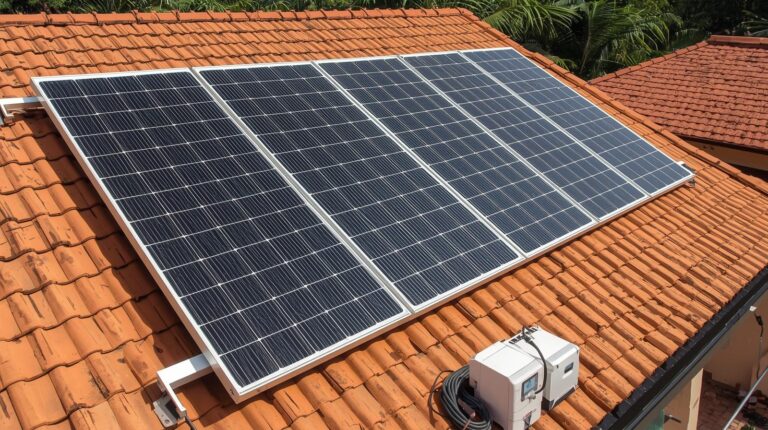
Connecting Solar Panels to the Inverter
To properly connect solar panels to the inverter, it is essential to follow the specific setup instructions provided by the manufacturer.
- First, ensure that the inverter is compatible with the solar panels and meets the grid connection requirements.
- Start by mounting the panels securely on a suitable structure and ensure proper alignment for maximum sunlight exposure.
- Next, connect the solar panels to the inverter using the appropriate electrical wiring and connectors, following the manufacturer’s guidelines.
- It is crucial to adhere to safety precautions such as turning off the main power supply and wearing protective gear during the installation process.
- Additionally, regularly inspect the electrical connections to ensure optimal system efficiency and minimize the risk of electrical hazards.
By following these steps and guidelines, the solar panel system can be connected to the inverter safely and effectively.
Establishing the Wiring System and Connecting to the Grid
This discussion will focus on the installation of the wiring system for solar panels and the necessary steps to ensure safety and compliance.
The wiring system plays a crucial role in connecting the solar panels to the grid, allowing for the efficient transfer of electricity. Proper installation techniques must be followed to ensure the system functions optimally and meets all safety and compliance standards.
Wiring System Installation
The installation of the wiring system involves connecting the positive and negative wires in the combiner box and running a ground wire while also connecting the AC circuit breakers.
To ensure a successful installation, it is important to follow proper wiring system design and adhere to safety precautions and electrical codes.
The grounding system is crucial for protecting the solar panels and the overall electrical system from potential electrical faults. This involves properly connecting the ground wire to a grounding electrode, such as a ground rod or a grounding plate.
Additionally, wire management is essential for both safety and efficiency. Properly organizing and securing the wires helps to prevent damage, reduce the risk of electrical fires, and facilitate any necessary maintenance or repairs.
Ensuring Safety and Compliance
In the previous subtopic, we discussed the installation process for the wiring system of solar panels. Now, we will delve into an equally crucial aspect of the installation and maintenance process – ensuring safety and compliance.
Safety precautions and regulatory compliance are of utmost importance when working with electrical systems. By adhering to electrical standards and following proper safety protocols, you can significantly reduce the risk of accidents and ensure the longevity of your solar panel system.
Fire prevention is a critical aspect that cannot be overlooked, as faulty electrical connections can lead to devastating consequences. Regular equipment inspection is necessary to identify any potential hazards or faults in the system.
By incorporating these safety measures into your installation and maintenance routine, you can ensure the safety and efficiency of your solar panel system for years to come.
A New Dimension for Solar Energy Can Slash Your Power Bills by 65%
>>> WATCH TO SEE HOW IT WORKS <<<
Maintenance, Troubleshooting, and Benefits
This section will discuss the importance of proactive maintenance, monitoring system performance, and maximizing benefits and savings in relation to solar panel systems.
Proactive maintenance involves regular inspections, cleaning, and repairs to ensure the optimal performance and longevity of the system.
Monitoring system performance allows for real-time tracking of energy production, identifying any issues or underperformance, and ensuring efficient operation.
Maximizing benefits and savings involves implementing strategies such as net metering, utilizing excess energy, and taking advantage of government incentives to maximize the financial returns and environmental benefits of solar panel installations.
Proactive Maintenance
To ensure the optimal performance and longevity of solar panels, proactive maintenance involves regular tasks such as:
- Checking for loose connections and cleaning dust
- Trimming trees or vegetation
- Inspecting wiring for corrosion or damage
Proactive maintenance plays a crucial role in system optimization and performance monitoring. By conducting regular inspections and maintenance, early detection of potential issues can be achieved, allowing for timely repairs or replacements.
Component inspection is an essential part of proactive maintenance as it helps identify any signs of wear and tear or damage that may affect the overall performance of the solar panels. This proactive approach ensures that any issues are addressed promptly, minimizing downtime and maximizing the efficiency of the solar panel system.
Monitoring System Performance
To ensure the long-term efficiency and optimal performance of solar panels, proactive maintenance is crucial. However, it is equally important to monitor the system’s performance regularly. Performance monitoring involves various tasks such as testing voltage output and identifying shading or obstructions that may affect the panel’s performance.
By analyzing the data collected through monitoring, the system can be fine-tuned for efficiency optimization. This process allows for early detection of any issues that may arise, enabling prompt addressing and minimizing potential downtime.
Regular system maintenance, coupled with performance monitoring, ensures that the solar panels continue to generate maximum electricity output and operate at their peak efficiency. Implementing these practices helps to extend the lifespan of the system and ensures the highest possible return on investment.
Monitoring system performance involves the following key steps:
- Testing voltage output regularly
- Identifying shading or obstructions that may affect performance
- Analyzing data to optimize system efficiency
- Early detection of issues for prompt addressing
- Regular system maintenance to ensure optimal performance.
Maximizing Benefits and Savings
Maximizing benefits and savings from solar panel installations can be achieved through various measures and strategies. One crucial aspect is maximizing efficiency. Proper maintenance, such as regular cleaning and debris removal, ensures that solar panels operate at their optimal capacity. Additionally, angle adjustment allows panels to capture the maximum amount of sunlight throughout the day, further increasing energy production.
Financial incentives play a significant role in maximizing benefits and savings. Tax incentives, such as the federal investment tax credit, can significantly reduce the upfront costs of installing solar panels. Grants and rebates provided by local governments or utility companies can further incentivize solar panel installations.
Another way to maximize benefits is through backup power and battery storage. These systems allow users to store excess energy generated during sunny periods and use it during cloudy or nighttime hours, reducing reliance on the grid and increasing savings.
Lastly, considering the solar panel lifespan is essential. Investing in high-quality panels with longer lifespans ensures that the benefits and savings continue for many years.
Conclusion
Embarking on the journey of installing and maintaining solar panels is like embarking on a quest to harness the power of the sun. Just like a skilled adventurer, one must carefully prepare and choose the right equipment to ensure success.
Setting up the solar panel system is akin to mapping out a precise route, while establishing the wiring system and connecting to the grid is like navigating treacherous terrain.
And finally, regular maintenance and troubleshooting are essential to reap the abundant benefits of renewable energy. So, embrace this quest, and let the sun guide you towards a greener future.