Fermentation is a natural process where beneficial microbes convert sugars into acids or alcohol, preserving foods and enhancing flavor. For beginners, start with simple projects like sauerkraut and kombucha, using clean jars, non-iodized salt, and breathable lids. Steps include prep, salt brine, submersion, daily monitoring, and tasting to judge safety and tang. Store finished ferments in the fridge to slow fermentation and maintain quality. If you keep exploring, you’ll uncover more techniques and flavor possibilities.
What Is Fermentation? (And Why It’s a Game-Changer)
Fermentation is the process where beneficial microbes, like Lactobacillus, convert sugars into acids or alcohol, and you can see this transformation in everyday foods. This simple science underpins how sauerkraut, yogurt, and kombucha develop their textures, flavors, and shelf stability. Understanding why fermentation matters—preservation, health benefits, and flavor—helps you decide what to try first and how to monitor safety.
The Simple Science
Consider a kitchen science you can actually observe: beneficial microbes convert sugars in food into acids or alcohol, a transformation that preserves, flavors, and nourishes. You learn the basics by watching how tiny organisms shape taste and texture. Here’s the simple framework you can trust:
- Fermentation basics: microbes create acids or alcohol, preserving food and enhancing safety.
- How to ferment food: follow salt brines, submerge ingredients, and monitor temperature.
- Lacto-fermentation examples: sauerkraut, pickles, kimchi illustrate friendly bacteria at work.
- Yeast and mold roles: kombucha, miso, tempeh show diverse pathways without guesswork.
Why It Matters
Beyond preserving meals, fermentation reshapes flavor, health, and how we think about food. You gain clarity about how tiny microbes reveal longer-lasting ingredients, and you learn to trust a natural process over quick fixes. This method delivers practical benefits: it preserves nutrients, supports digestive balance, and broadens your palate with savory depth and umami.
You’ll discover that fermentation isn’t a novelty; it’s a reliable technique that connects culture, science, and everyday meals. By choosing to ferment, you join a shared practice that values patience, craft, and nourishment, while reducing waste and expanding what belongs in your kitchen.
| Benefit | Impact |
|---|---|
| Preservation | safety over time reliably |
| Probiotics | digestion and balance |
| Flavor | depth umami blends |
| Community | value shared learning |
| Less waste | spoilage reduction |
| Accessibility | beginners everywhere online |
Equipment You Actually Need (No Fancy Gear!)
You only need a simple starter kit to begin fermenting, and the right tools keep projects on track. With Mason jars or crocks, non-iodized salt, a wooden spoon, and a breathable lid, you’ll cover the basics without fuss. Cleanliness matters, not sterile perfection—wash gear to remove detergent residue and debris, and keep surfaces free of contaminants to protect your ferment.
Essential Starter Kit
Five essential tools form the core of a beginner’s fermentation kit, giving you the basic setup to start safely. With these basics, you’ll respect the process, follow a clear beginner fermentation guide, and feel part of a practical community.
- Mason jars or crocks for vessels
- Non-iodized sea salt for brine
- Wooden spoon for gentle mixing
- Cloth or lid to protect and vent
These essentials keep you focused on safe, straightforward projects and avoid unnecessary gear, supporting confidence as you begin your fermentation journey. Keep these tools clean and organized, label batches, and reuse vessels for multiple projects to build familiarity and belonging. As you grow, this essential starter kit remains reliable, grounding beginners as they explore more complex ferments safely.
Cleanliness = Success
Cleanliness doesn’t mean sterilizing every surface or equipment; it means keeping your tools free from detergent residue and debris that could interfere with fermentation. You’ll save time and avoid contamination by rinsing thoroughly and using clear containers.
Choose simple gear you trust: jars, lids, towels, and a spoon that’s free of additives. Label your batches and keep a clean workspace to prevent cross-contact between projects. Avoid abrasive cleaners and scented soaps that linger. When you notice off smells or mold, pause and reassess your setup.
Cleanliness = success, but it’s about consistent habits, not perfection. A mindful routine reduces beginner fermentation mistakes and builds confidence as you explore sauerkraut, kombucha, and beyond. Keep notes, adjust methods, and share tips with fellow makers in community.
Related Post: 5 Forgotten Food Preservation Methods That Still Work Better Than Freezing.
The Basics: How Fermentation Works Step-by-Step
Step 1: Prep the Ingredients
Chop, shred, or slice the produce into pieces that are uniform in size; the smaller the pieces, the faster fermentation begins. In Step 1, you prep ingredients by choosing clean vegetables and removing spoiled bits. Your goal is consistent texture, which helps even acid development and flavor. Focus on practicality, clarity, and surface area to kickstart fermentation.
- Gather fresh produce and tools, washing hands and jars before use.
- Trim off bruised spots; pat produce dry to minimize excess moisture.
- Slice or shred uniformly to promote even brine absorption.
- Measure salt separately to plan the correct ratio for fermentation.
This groundwork supports how to make sauerkraut and outlines fermentation process steps with precision. Clarity, patience, and consistency drive successful outcomes home.
Step 2: Salt and Brine
With vegetables prepped, you’ll create a brine by applying salt at about 2% of the weight of the produce. Salt draws water from vegetables, forming a protective brine that favors lactic acid bacteria. In lacto-fermentation explained terms, this natural selection suppresses spoilage organisms while preserving nutrients and texture.
The scale is simple: keep beneficial microbes happy, and unsafe microbes die off. The brine becomes a living medium where fermentation begins slowly as juices release. Monitor temperature and salt balance as you proceed; this builds consistency, confidence, and a sense of belonging to a practical food tradition. That connection matters for beginners seeking community through shared projects and steady results you can taste and trust. Use this method for vegetables, then expand with confidence later.
Step 3: Submerge & Wait
Next, keep everything beneath the liquid to block oxygen and slow the growth of unwanted microbes. Submerging is vital for safe fermentation, supporting submerge & wait and gut health. By keeping the food fully covered, you prevent air from fostering unwanted microbes and you promote a stable, acidic environment.
1) Make certain the produce stays below the brine line at all times.
2) Press and compact to release juices and maintain full coverage.
3) Check for air pockets and push them under the liquid promptly.
4) Replace any floating pieces and reseal to maintain a tight seal.
This step minimizes oxidation and helps preserve texture and nutrient integrity, reinforcing why beginners should focus on controlled submersion for consistent results and gut health benefits. Keep notes for future batches ahead.
Step 4: Monitor
Once fermentation starts, monitor it daily to gauge progress and safety at home. You check temperature, aroma, and texture, noting changes as they occur. If anything seems off, document observations and adjust conditions promptly.
Daily tasting after day 3 confirms safety and flavor development, guiding next steps for your beginner sauerkraut recipe and other projects. Use patience: small shifts matter, and fermentation troubleshooting insights prevent problems. This routine builds confidence, belonging, and skill, turning you into a thoughtful fermenter.
| Step | Focus |
|---|---|
| Temp check | Aroma and texture assessment |
| Day 3 tasting | Flavor balance and safety evaluation |
| Adjust if off | Document changes and outcomes |
| Record results | Prevent issues and contamination risks |
| Belonging mindset | Confidence growth through practice and feedback |
Step 5: Store
Fridge storage slows fermentation and preserves the batch. When you move finished ferments to the fridge, you slow microbial activity, maintain flavor, and minimize changes. This keeps sauerkraut recipe flavors steady and supports consistent results for how to make kombucha. Use these steps to store safely:
- Store in a closed, airtight container in the fridge.
- Label with date and contents.
- Keep a steady temperature, ideally 38–40°F (3–4°C).
- Check for off smells and signs of spoilage before tasting.
This approach preserves quality, avoids waste, and supports a community of home fermenters who value safe, delicious results. By preparing ahead, you minimize surprises and reinforce the sense of belonging that comes from sharing ferments with friends and family in your kitchen.
Related Post: DIY Solar Oven: Cook and Dehydrate With the Sun.
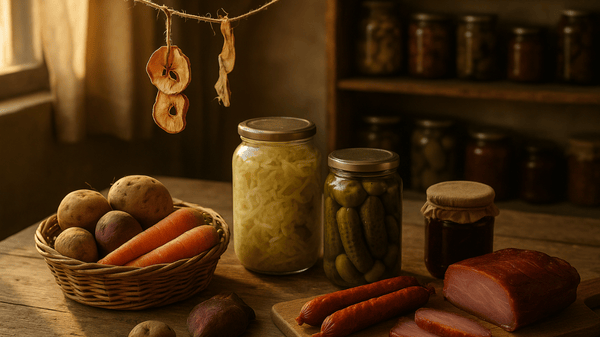
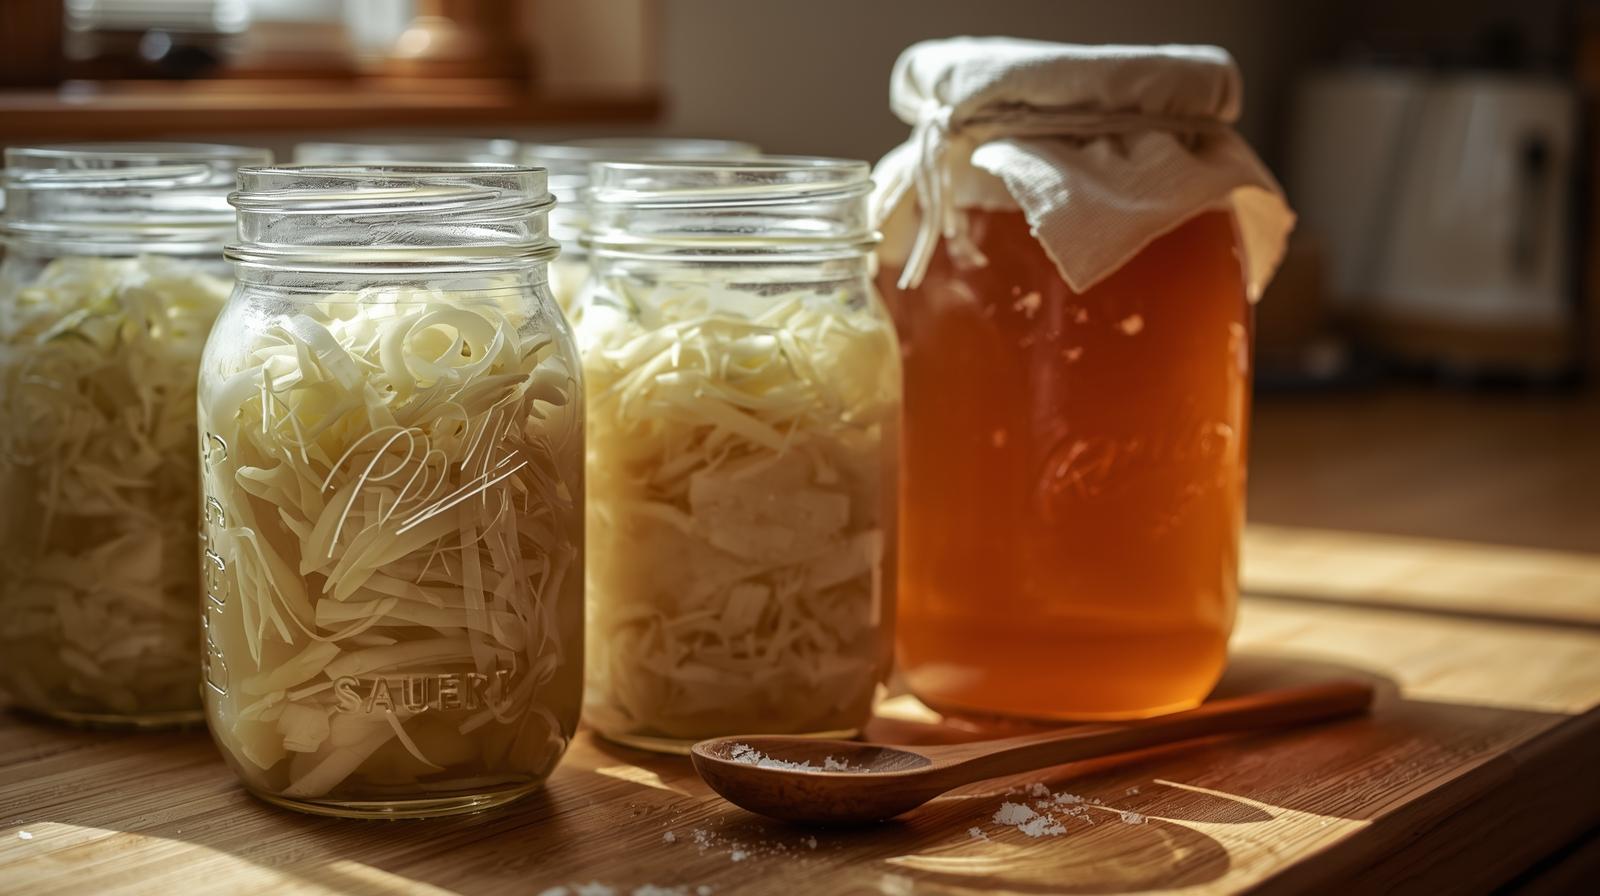
Beginner Project #1: Sauerkraut
For Beginner Project #1: Sauerkraut, gather the core Ingredients—cabbage and salt—and follow the Steps to create a brine-friendly environment. Pack the shredded cabbage tightly, keep it submerged, and use the daily Taste tests and practical Tips to guide fermentation and safety. By sticking to this focused sequence, you’re building confidence and learning how to ferment vegetables at home.
Ingredients
Cabbage and sea salt form the foundational combination for your beginner sauerkraut. In this project, you rely on simple ingredients to invite beneficial microbes and safe fermentation. You’ll learn how to ferment vegetables by creating an inviting brine and ensuring proper submersion, which protects flavor and texture.
1) Use 1 medium cabbage and 1 tbsp sea salt to start.
2) Shred cabbage finely for even brining.
3) Massage salt into the shreds until liquid appears.
4) Pack tightly in a jar, ensuring the cabbage stays submerged.
Farmed science aside, you maintain cleanliness and patience as you observe modest bubbles signaling activity. This approach supports fermentation for beginners by focusing on fundamentals and safe handling. The method aligns with how to ferment vegetables, delivering reliable, tangible results for everyone.
Steps
Now that you’ve gathered the cabbage and sea salt, you’re ready to move into the practical steps of making sauerkraut. Start by shredding cabbage finely, then massage with salt until juicy. Pack tightly into a jar, guaranteeing brine covers cabbage. Cover and leave at room temp for 5–7 days. Taste daily until tangy to determine readiness.
This approach keeps the process simple and reliable, aligning with beginners’ needs and fostering belonging in a shared kitchen practice. For context beyond kraut, you might explore ideas like a kombucha recipe for beginners and easy fermented recipes to broaden your skills.
Maintain clean utensils and monitor brine levels to verify consistent fermentation progress. This steady routine builds confidence and invites you to experiment with flavors safely together.
Tips
If you’re starting fermentation for the first time, this beginner project is ideal for gaining a hands-on, low-risk introduction to preserving vegetables. Choose red cabbage for color and crunch, and add carrots, garlic, or caraway seeds to boost aroma and flavor.
This approach aligns with how to make sauerkraut and lacto-fermented cabbage, offering a beginner sauerkraut recipe that’s straightforward and forgiving. Keep the salt level modest, press firmly to release brine, and guarantee vegetables stay submerged to prevent mold.
A well-prepared ferment builds confidence, invites curiosity, and signals belonging to a community that values precision, safety and progress.
Best For: beginners who want a practical, approachable intro to fermentation and want to start with simple projects like sauerkraut and kombucha.
Pros:
- Simple, actionable projects that build confidence.
- Teaches safe fermentation practices and a clean, beginner-friendly workflow.
- Uses readily available ingredients and minimal gear.
Cons:
- Requires time and patience to wait for fermentation to develop.
- Results can vary with room temperature and batch size.
- Some batches may require careful monitoring to avoid spoilage.
Beginner Project #2: Kombucha
You’ll learn the essential ingredients for kombucha, including a SCOBY, tea, sugar, and starter liquid, and how they work together. The core steps guide you from brewing the tea to fermenting with the SCOBY and tasting for balance, with practical timing and temperature considerations. Use clear tips—glass vessels, avoid metal, guard against contamination, and explore flavoring options to support consistent results.
Ingredients
For any beginner, the kombucha base requires a SCOBY, 8 cups of filtered water, 4–6 black or green tea bags, and ½ cup sugar. You’ll assemble these ingredients first, then monitor details like cleanliness and temperature to guarantee safety. Use a glass jar, cover with breathable cloth, and keep it away from direct sunlight as you brew. The process relies on symbiotic cultures to transform sugar into balanced flavors, so patience matters. Here are the essentials to keep in mind:
- SCOBY presence and starter liquid
- Properly cooled tea at room temperature
- Non-iodized sugar dissolved fully
- Clean, breathable fermentation vessel
These steps help you build confidence for kombucha at home while exploring fermented foods to try beyond basics in your kitchen.
Steps
Start by brewing sweet tea and letting it cool completely, then introduce your SCOBY and starter liquid to begin the fermentation journey. During Step 3 in your beginner fermenting guide, cover the jar with cloth and secure it with a rubber band to keep dust out while letting gases escape.
Fermentation lasts 7–10 days, and you should taste for balance to align sweetness and tang. After tasting, bottle if you want a gentle second fermentation with fruit or ginger, then refrigerate to slow activity.
These steps reinforce a sense of belonging as you follow a proven method in fermented foods, supporting gut health and the broader home fermentation community. Document observations, adjust timing, and share results to strengthen the beginner fermenting guide mindset together.
Tips
Glass jars are the best vessels for kombucha, since metal can react with the brew and alter flavor. To maximize safety and taste, follow these practical tips:
- Keep the brew out of direct sunlight to protect flavor integrity.
- Use glass jars, not metal, to avoid reactions and preserve clarity.
- Maintain a consistent room temperature to support steady fermentation.
- Taste-test regularly after day 3 to monitor balance and avoid over-fermentation.
Additionally, remember the benefits of fermented foods and the zero waste kitchen mindset: reuse jars, minimize waste, and appreciate the probiotic value. Cleanliness matters without over-sanitizing; rinse tools to remove residues. If you observe off odors, discard and start new with clean equipment. This mindset supports community and sustainable cooking practices.
Beyond the Basics — Try These Next
Beyond the basics, you can explore tempeh, yogurt and kefir, pickled veggies and kimchi, and a sourdough starter to broaden your fermenting repertoire. Tempeh introduces mold-based fermentation with soy, while yogurts and kefir empower you with dairy probiotics; pickled veggies and kimchi build on lactic fermentation, and sourdough teaches you to harness wild yeast.
Each path has its own safety checks, temperature needs, and timing, so you can plan experiments that fit your kitchen and schedule.
Tempeh
Tempeh is a firm, nutty-flavored soy product that plants itself as a hearty addition to fermented meals. You’ll find it versatile in stir-fries, sandwiches, and bowls, offering substance without heaviness. To incorporate tempeh into your menu, try these approaches:
- Slice and pan-fry for a crisp exterior.
- Crumble into chili or tacos for texture.
- Marble with soy sauce and maple for depth.
- Steam then toss with vegetables and sauce.
Tempeh requires warmth for fermentation, about 86°F / 30°C, to develop its cake-like structure. While it isn’t lacto-fermented cabbage, it sits alongside other probiotic foods in your kitchen, broadening your access to fermented flavors. Embrace tempeh as a reliable plant-based protein that supports gut health without complicating prep. This makes it a choice for curious cooks.
Yogurt & Kefir
Yogurt and kefir are dairy-based fermented foods that deliver probiotic benefits with minimal effort. You can enjoy them as snacks, breakfast toppers, or smoothie boosters, using store-bought cultures if you prefer convenience. These products illustrate what is fermentation in practical terms, powered by live microbes that thrive in dairy.
When you choose yogurt or kefir, you’re embracing a simple path to gut health naturally, with a familiar flavor profile and approachable texture. Fermentation basics stay consistent here: milks are inoculated, cultures do the work, and you age the product just enough for tang.
Beyond flavor, you gain supported digestion and immune balance from the probiotics, without complicated equipment. Keep an eye on sugar content and opt for plain varieties to reduce additives, overall well-being.
Pickled Veggies & Kimchi
If you’re looking to expand your fermentation repertoire, pickled veggies and kimchi offer versatile, flavorful options. You’ll learn to use the same salt-brine method as sauerkraut, then customize with spices to suit your taste and goals for sustainable food preservation and eco-friendly living.
- Select vegetables and salt at ~2% brine
- Pack tightly to submerge completely
- Add spices or chili for depth
- Ferment at room temperature and taste regularly
Keep equipment clean, monitor airflow, and refrigerate once the flavor develops to maintain safety and quality. This approach supports community sharing and reduces waste by nourishing flavor with simple ingredients. As you practice, you’ll notice textures, aromas, and tang evolve, confirming your kitchen is part of a mindful, resilient food system. Together, we eat with intention.
Sourdough Starter
After exploring how salt-brine builds a friendly environment for ferments like kraut and kimchi, you can carry that same microbial teamwork into bread with a sourdough starter. You mix flour and water, then feed daily; wild yeast creates natural leavening that lifts dough and builds flavor.
Beyond sauerkraut and kombucha, this method emphasizes patience, observation, and clean technique to guarantee reliable results. Starter maintenance is straightforward: feed with fresh flour and water, keep the environment moderate, and watch for steady bubbles.
With consistent practice, you’ll develop a resilient culture that supports crusty loaves, tangy crumb, and a sense of belonging to a shared craft. Keep notes, compare hydration levels, and savor the first loaf as evidence of your kitchen community growing every single day.
Related Post: 10 Healing Herbs to Plant in September (and Why They Belong in Your Garden)
Troubleshooting Common Fermentation Issues
When fermentation isn’t going as planned, you’ll often notice a few repeat issues that point to underlying causes.
Here’s how to read the signs and fix them quickly, using the standard troubleshooting you’ll rely on.
- White film (kahm yeast) — Too much air exposure. Skim off, clean edges.
- Mold — Food not submerged. Discard and restart.
- Slimy texture — Too hot or too little salt. Adjust next batch.
- No bubbles — Room too cold. Move to warmer spot.
Remember to document batch details, adjust salt, proof your water source, and maintain a room temperature. These checks prevent contamination, improve safety, and help you stay confident in your fermentation journey.
The Health Benefits of Fermented Foods
You’ll notice fermented foods support gut health by introducing live probiotics that aid digestion and immunity. They also boost nutrient availability, making vitamins like B vitamins and K2 easier to absorb, which can influence energy and metabolism. Together, these effects help balance mood and energy levels as you incorporate a wider range of fermented foods.
Gut Health
Fermented foods deliver live probiotics that support gut health by boosting beneficial bacteria in your digestive system. When your gut microbiome thrives, digestion improves and immunity gets a subtle boost. You’ll notice steadier energy and fewer digestive upsets as balance returns.
- Regular intake supports microbial diversity.
- Probiotics may enhance digestion of fiber.
- Improved gut barrier function reduces irritants.
- Consistent consumption aligns with a mindful, shared kitchen habit.
These effects grow with steady practice and choosing a variety of ferments. Your kitchen becomes a platform for health, learning, and belonging. To start, incorporate a small daily portion and rotate flavors weekly. Pair ferments with meals to improve adherence. Track how your body responds to different products, noting mood, energy, and digestive comfort for ongoing adjustments.
Nutrient Boost
Fermentation can heighten the nutritional value of foods by making certain vitamins easier for your body to absorb. When you eat fermented foods, your body more readily accesses B vitamins and vitamin K2, supporting energy production and bone health. That boost comes from microbes that release nutrients during fermentation, making compounds easier to extract.
You may notice steadier energy and fewer cravings as your gut balance improves. In practice, include a variety of fermented vegetables, dairy or tea beverages to diversify vitamins. By building these foods into your routine, you contribute to a resilient nutrient supply that supports focus, immunity, and growth. The vitamin pathways are enhanced without extra pills, aligning with a mindful approach to health and community dining shared around the table.
Balance & Energy
A natural extension of the nutrient boost you get from fermented foods is how they affect daily energy and moods. When you consume probiotic-rich foods, your digestion improves, which supports steadier energy and fewer mood dips. This balance helps your metabolism run more efficiently, reducing fatigue after meals. You’ll notice fewer sugar crashes as cravings become steadier.
1) steadier energy throughout the day
2) reduced sugar cravings
3) improved mood stability
4) enhanced metabolic support
To put it into practice, use fermented staples daily and notice the changes. With consistent fermentation, you join a community that values healthful choices and sustainable living, reinforcing belonging and confidence in your kitchen’s potential. Over time, these small, deliberate steps accumulate into lasting energy, focus, and social connection around shared meals together.
Why Fermentation Is the Ultimate Zero-Waste Practice
When you turn imperfect produce into palatable, shelf-stable foods, fermentation becomes a powerful zero-waste strategy. This approach preserves food without relying on refrigeration, extending shelf life and reducing spoilage. It also transforms “ugly” produce into valuable, flavorful ingredients you can use in meals, cutting waste at the source.
By choosing fermentation, you lower packaging waste from store-bought products and avoid needless disposal. The practice invites a slower, mindful routine that respects nature’s rhythms, helping you align daily choices with sustainable living. Together these benefits support a community ethos: you belong to a network of cooks who value resourcefulness, health, and stewardship while enjoying diverse, delicious ferments. This shift reduces landfill contributions and builds resilience through practical, repeatable practices you can share with others today.
Frequently Asked Questions
Is Fermentation Safe for Beginners to Try at Home?
Yes, fermentation is safe for beginners when you follow simple safety rules. Start with proven, low-risk projects like sauerkraut or kombucha, using clean tools and non-iodized salt. Keep everything submerged, monitor temperatures, and smell and taste for routine signs of safe activity. If you see mold, off smells, or sliminess, discard and start over. With patience and proper steps, you’ll build confidence and enjoy healthy, flavorful results at home today.
How Long Does Flavor Development Take During Fermentation?
Flavor development happens gradually as microbes build acids, alcohols, and complex compounds. For vegetables, you’ll notice subtle tangs after 3 to 5 days at room temperature, with deeper flavor by day 7 to 14. Kombucha usually develops fizz and balance in about 7 to 10 days, with ongoing changes if you continue. Taste regularly, refrigerate once you’re satisfied to slow further development. If you’re fermenting warm, expect changes; spaces slow.
What Signs Indicate a Successful Fermentation?
You’ll know a fermentation is successful when activity is steady and predictable: bubbles rise consistently, aromas turn pleasantly sour or fruity, and texture firms with a bright tang. Taste matters most: you should detect balanced acidity with no off-putting yeasty, moldy, or rancid notes. Colors stay vibrant, vegetables stay submerged, and there’s no slimy film. Safe fermentation shows stable pH, clear brine, and a clean, lingering finish that lasts long.
Do I Need Special Equipment for Kombucha?
Do you need special equipment for kombucha? Not really. You can start with simple, common items: a clean glass jar, breathable cloth or coffee filter, and a rubber band to cover it. You’ll also need a SCOBY and starter tea, plus tea, sugar, and water. Optional: an airlock lid. Keep everything clean, submerged, and away from direct sunlight to guarantee safe fermentation and clear second-fermentation flavors, for consistent, tasty results.
Can Fermented Foods Replace Probiotic Supplements?
Fermented foods can support gut health, but they don’t reliably replace probiotic supplements for everyone. You get live microbes from sauerkraut, yogurt, kefir, and kombucha, yet strains, counts, and stability vary by batch. For general health, these foods can complement a balanced diet; for medical needs, consider evidence-backed supplements or medical advice. If you’re aiming to replace supplements, consult a clinician and track how your digestion responds over several weeks.
Conclusion
By now you’ve learned the basics, how fermentation works, and how to start simple projects with confidence. This approach isn’t about perfection; it’s about steady practice and observation. For example, imagine you jar cabbage on a weekend, taste it after a week, and notice a pleasantly tangy crunch that links you to generations of home cooks. You’ll refine technique, track texture and flavor, and extend these methods to other foods, with patience and curiosity intact.