What if you could cook a hot meal or dry fruits for storage without using a single watt of electricity? Imagine preparing rice, beans, or even bread while your oven costs nothing to run. Or dehydrating apples and herbs with the same warmth that lights your backyard.
That’s the beauty of a DIY solar oven. With just a few simple materials—often things you already have around the house—you can build a cooker that harnesses the sun’s energy. No fuel, no gas, no electricity. Just sunlight, reflection, and insulation.
Solar ovens are not just eco-friendly novelties. They’re practical tools for sustainable living, emergency preparedness, and food preservation. In this guide, you’ll learn what a solar oven is, how to build one step by step, and how to use it to both cook hearty meals and dehydrate food for long-term storage.
What Is a Solar Oven and How Does It Work?
A solar oven, sometimes called a solar cooker, is essentially a box designed to trap sunlight and turn it into heat.
Here’s how it works:
- Reflective surfaces (like aluminum foil) concentrate sunlight into the box.
- A dark interior (black paint or paper) absorbs heat.
- A transparent lid (glass or clear plastic) keeps heat inside while letting light through.
- Insulation (newspaper, wool, or straw) reduces heat loss.
Temperatures in a well-built DIY solar oven typically reach 200–300°F—enough for slow cooking, baking, and even dehydrating.
Why build one?
- Completely fuel-free cooking.
- Perfect for off-grid or emergency situations.
- Gentle cooking that preserves nutrients.
- A fun, family-friendly DIY project that teaches energy resilience.
Materials You’ll Need to Build a DIY Solar Oven
The best part about solar ovens? They’re incredibly affordable. Many people build them entirely from recycled or household materials.
Here’s what you’ll need:
- Box or crate: Sturdy cardboard box or wooden crate.
- Reflective material: Aluminum foil, mirrored panels, or windshield reflectors.
- Transparent cover: Glass sheet, plexiglass, or clear plastic wrap.
- Absorber: Black construction paper or non-toxic black paint.
- Insulation: Shredded newspaper, wool, or straw.
- Tools: Scissors, tape, glue, or utility knife.
- Optional: Thermometer to monitor internal temperature.
💡 Budget tip: Old pizza boxes make great starter solar ovens for snacks and experiments.
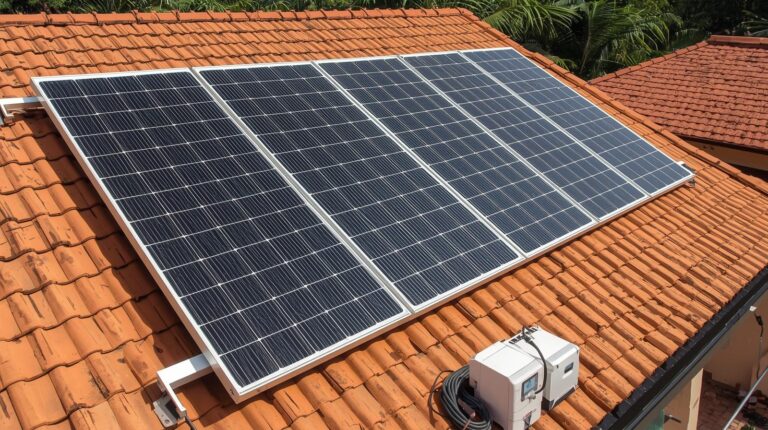
⚡ Want to Stay Powered When the Grid Goes Dark?
Cooking with the sun is just the beginning. Learn how to keep lights, devices, and even critical systems running during any outage.
👉 Discover Dark Reset here.
Step-by-Step Guide to Building a Solar Oven
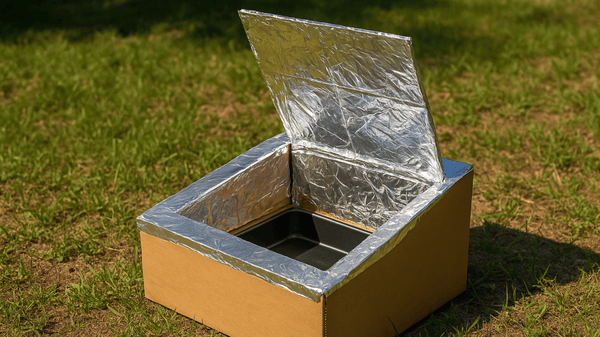
Step 1: Prepare the Outer Box
The outer box forms the structure and insulation layer of your solar oven, so choosing the right materials is key. A sturdy cardboard box works for most DIY builds, but a wooden crate will be more durable if you plan to use it regularly. Line the inside walls with insulation—shredded newspaper, wool, straw, or even crumpled cardboard layers.
This insulation slows down heat loss and helps the oven maintain consistent cooking temperatures. The size of the box matters too: larger boxes can trap more heat, but they need more reflective surfaces to stay efficient. Aim for a balance—big enough to cook family-sized meals but manageable to move and adjust toward the sun.
Step 2: Create the Heat Chamber
The inner box—or heat chamber—is where the actual cooking happens. This smaller box sits inside the outer box, surrounded by the insulation you added earlier. To maximize heat absorption, paint the inside of the box black with non-toxic, heat-resistant paint, or line it with black construction paper. Dark surfaces absorb sunlight and convert it into heat far more effectively than lighter ones.
For best results, keep the inner chamber snug but not touching the insulation, leaving space for trapped air to circulate. Place a flat tray or rack inside where your pots or food will sit. The more efficiently your chamber absorbs sunlight, the faster and hotter your oven will cook.
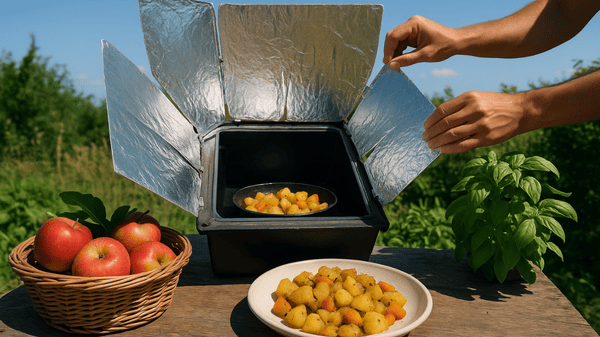
Step 3: Add Reflective Panels
Reflective panels are what give your solar oven its power. These are usually created by cutting flaps in the lid of your outer box and covering them with aluminum foil (shiny side out) or using reflective windshield shades. Angle the panels so they bounce sunlight directly into the heat chamber, focusing as much energy as possible onto your food.
You can experiment with different reflector shapes—V-shaped or parabolic setups concentrate light more efficiently than flat panels. The trick is adjustability: use sticks, tape, or hinges so you can tilt and reposition the panels throughout the day as the sun moves. More reflection equals more heat, making this step one of the most crucial.
Step 4: Install the Transparent Lid
The lid is your oven’s “glass door,” keeping heat in while allowing sunlight to enter. The most effective lids are made from glass or plexiglass, but even heavy-duty clear plastic wrap can work for beginner builds. Place the lid securely on top of the inner box, making sure it seals tightly to prevent heat from escaping.
A double layer of plastic wrap or glass with an air gap between can boost insulation, acting like double-paned windows. The lid should also be easy to lift or slide aside so you can place and remove food. Think of this component as the difference between a weak cooker and a powerful solar oven—the tighter and clearer the lid, the more efficient your oven will be.
Step 5: Adjust for the Sun
The final step is all about positioning. Even the most well-built solar oven won’t work if it’s not aligned with the sun. Place your oven facing true south (in the Northern Hemisphere) or true north (in the Southern Hemisphere) to capture maximum light. Tilt the reflective panels so sunlight bounces directly into the heat chamber.
The angle of your panels should change throughout the day—what works at noon won’t be optimal at 3 p.m. For best results, check and adjust your oven every 30–60 minutes. Adding a simple thermometer inside can help you monitor temperature changes as you fine-tune placement. Mastering this step transforms your solar oven from a novelty project into a reliable cooking tool.
💡 Upgrade tip: Add multiple reflector panels for more concentrated sunlight and higher cooking temperatures.
Cooking With Your Solar Oven
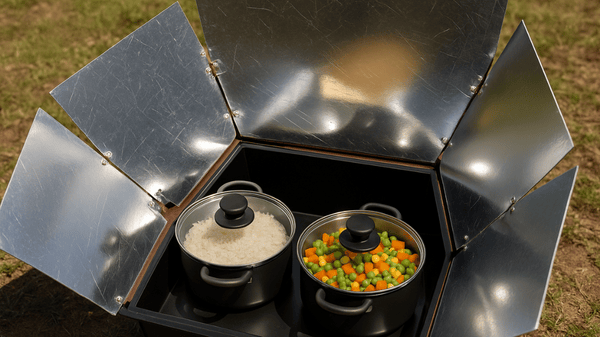
Grains: Rice, Quinoa, and Beans
Grains and legumes are ideal for solar cooking because they thrive under gentle, slow heat. A simple pot of rice can be ready in 2–3 hours depending on sun intensity, while beans may take longer but require no soaking if left all day in strong sun. Use a dark, thin pot with a lid to maximize heat absorption and keep steam locked in.
Quinoa cooks especially well since it requires less water and time than beans. Solar-cooked grains often taste richer because the low heat preserves subtle flavors. Think of your solar oven as a “hands-off” crockpot—no stirring required.
Vegetables: Potatoes, Carrots, and Squash
Hearty vegetables like potatoes, carrots, and squash cook beautifully in a solar oven. They retain their nutrients and natural sweetness when slow-cooked, unlike boiling where vitamins leach into water. Dice veggies into smaller chunks to reduce cooking time, then place them in a covered dish.
Expect potatoes to take around 3–4 hours and carrots slightly less. Squash becomes tender and caramelized, making it perfect for soups or purees. Because the oven never burns food, you can leave veggies inside longer without worry, freeing you up to garden, read, or simply enjoy the sunshine while dinner takes care of itself.
Casseroles and Stews
One of the greatest strengths of a solar oven is cooking “one-pot” meals like casseroles and stews. Simply layer grains, beans, vegetables, and broth in a covered pot and let the sun do the rest. Within 3–5 hours, you’ll have a flavorful, slow-cooked dish ready to serve.
Solar stews develop deep, blended flavors much like a traditional slow cooker, but without electricity. Add herbs and spices early on since the gentle heat infuses them gradually. Stews are also forgiving—if left in longer than needed, they’ll only get tastier as flavors meld, making them a great beginner-friendly solar meal.
Breads, Cornbread, and Muffins
Yes, you can bake bread in a solar oven! While temperatures won’t rival a commercial oven, solar ovens can reach 250–300°F, enough for smaller baked goods like cornbread, muffins, or flatbreads. Use dark baking pans and cover them with a clear lid to trap additional heat. Baking usually takes 2–4 hours depending on sun strength.
Solar-baked breads rise more slowly but develop a moist, tender crumb. Cornbread is especially successful since it cooks through evenly without needing rapid heat. Imagine enjoying homemade muffins baked entirely with sunlight—a rewarding combination of sustainability and comfort.
Desserts: Brownies and Fruit Crisps
If you’re looking to impress, desserts like brownies and fruit crisps are surprisingly easy in a solar oven. The steady, gentle heat prevents burning and creates gooey, rich brownies or perfectly caramelized fruit toppings. For crisps, combine apples, pears, or peaches with sugar and oats, then let the sun bake it into a golden treat over 3–4 hours.
Brownies typically take a similar amount of time but remain moist thanks to the sealed environment. These desserts showcase solar ovens as more than just survival tools—they’re fun, delicious, and bring a sense of accomplishment when served to friends and family.
Dehydrating Foods in a Solar Oven
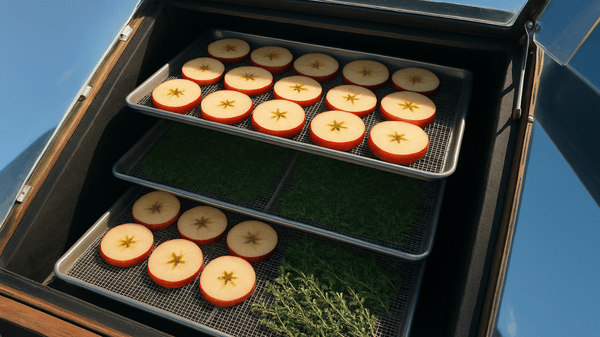
Fruits: Apples, Pears, Bananas
Fruits are some of the easiest and most rewarding foods to dehydrate in a solar oven. Slice them thinly and lay them on racks or screens to allow airflow. Keep oven temps between 120–150°F by venting the lid slightly, preventing “cooking” instead of drying. Apples and pears become chewy snacks packed with concentrated sweetness, while bananas develop into energy-boosting chips.
Drying can take 6–12 hours depending on thickness and sun strength, so plan for a full day. The reward? Lightweight, nutrient-rich fruit that lasts months in storage and makes a perfect healthy snack for winter or hiking trips.
Herbs: Basil, Oregano, Thyme
Herbs dry exceptionally well in solar ovens, often within a few hours. Spread them thinly on trays and keep temperatures low to preserve oils and flavor. Properly dried herbs crumble easily and can be stored in airtight jars for months. Unlike freezing, which can dull their aroma, solar-dried herbs keep their potency and even intensify in flavor.
Basil, oregano, thyme, and rosemary are excellent candidates. Herbs are also a great “test batch” for beginners since they dry quickly and give you immediate results. A pantry stocked with your own sun-dried herbs adds both flavor and pride to your cooking year-round.
Vegetables: Tomatoes, Peppers, Mushrooms
Vegetables like tomatoes, peppers, and mushrooms are ideal for solar dehydration. Slice them thinly and use racks to ensure air circulation. Dehydrated tomatoes become intensely sweet and flavorful, perfect for winter soups or pasta. Peppers dry into brittle pieces that can be ground into powder.
Mushrooms shrink dramatically, making them lightweight and easy to rehydrate later. Drying usually takes 8–10 hours, and rotating trays helps ensure even results. Compared to freezing, dehydrated vegetables save space, avoid freezer burn, and pack a powerful punch of flavor in every bite—proof that ancient methods still outperform modern appliances.
Meat Jerky: Beef or Venison
Yes, you can make jerky with a solar oven. By maintaining low temperatures and good airflow, strips of seasoned beef or venison can be dried into shelf-stable protein that lasts months. Cut meat into thin strips, marinate with salt and spices, then lay them on racks. Vent the lid for airflow and monitor carefully to keep temps around 140°F.
Depending on conditions, drying can take 8–12 hours. Jerky is an excellent survival food—lightweight, long-lasting, and packed with energy. Unlike frozen meat, which requires electricity to preserve, jerky stays good in a backpack or pantry without any reliance on modern systems.
Tips for Success With Solar Cooking & Dehydration
Use Dark, Thin Cookware
For best results, choose pots and pans that are dark-colored and lightweight. Black enamel or cast-iron cookware absorbs and holds heat more efficiently than shiny or thick dishes. Thin cookware also allows heat to penetrate faster, reducing overall cooking time. Avoid reflective or glass pans, as they bounce light instead of capturing it.
Cook at Midday for Maximum Sun Power
The strongest solar energy occurs between 10 a.m. and 3 p.m. Plan your meals around this window to ensure consistent, reliable heat. Starting too early or too late may leave your dish undercooked.
Rotate the Oven for Consistency
As the sun moves, your oven’s angle should change too. Rotating your solar oven every 30–60 minutes ensures even heating and prevents hot spots. Simple adjustments can make the difference between lukewarm food and a fully cooked meal.
Vent for Dehydration
When dehydrating, don’t forget to crack the lid or create small vents for airflow. This prevents food from steaming instead of drying and helps maintain the lower temps needed for fruits, herbs, and jerky.
Pair Solar Cooking With Other Preservation Methods
Solar ovens shine brightest when combined with other old-fashioned techniques. For example, dehydrate fruits with your oven, then store them in airtight jars with oxygen absorbers. Or cook beans in your solar oven, then ferment leftovers into nutrient-rich snacks.
💡 Building a solar oven is just one way to prepare for energy uncertainty. If you’re serious about off-grid resilience, Dark Reset is a powerful guide. It teaches how to keep essential systems running in any blackout, using simple tools and survival-tested methods. Pairing it with skills like solar cooking ensures you and your family are ready for any emergency.
⚠️ Common Mistakes to Avoid
Building Too Small
A solar oven that’s too small won’t trap enough heat to cook effectively. While pizza box ovens are fun for kids, larger boxes or crates are better for real meals.
Skipping Insulation
Without insulation, heat escapes quickly, and your oven will struggle to maintain cooking temperatures. Even something as simple as shredded newspaper can dramatically improve efficiency.
Loose or Poorly Sealed Lids
The lid is the gateway for sunlight and the barrier for heat retention. If it doesn’t seal tightly, your oven will leak energy. Double-check seals and use clear plastic or glass for the best balance of transparency and insulation.
Cooking on Cloudy Days Without Backup
Solar ovens depend on direct sunlight. On overcast days, they may not get hot enough for safe cooking, especially for meats. Always keep an alternative method—like a camp stove or traditional oven—ready as a backup.
Not Testing Before Cooking Meals
A common beginner mistake is throwing in a pot of stew without testing oven performance first. Start small with a thermometer test or by cooking easy foods like rice or vegetables. This helps you learn how your oven responds before relying on it for larger meals.
💡 Pro tip: Always test your oven with a thermometer before cooking meals.
FAQs About DIY Solar Ovens
Q: How hot can a solar oven get?
Most DIY models reach 200–300°F. With multiple reflectors and good insulation, some reach 350°F.
Q: Is it safe to cook meat in a solar oven?
Yes, as long as meat reaches the recommended safe internal temperature. Always check with a food thermometer.
Q: Can I use a solar oven in winter?
Yes, but cooking times are longer and results depend on sun angle and cloud cover. Reflectors are even more important.
Q: What’s the cheapest way to build one?
A pizza box lined with foil and plastic wrap makes an excellent starter oven for under \$5.
Conclusion: Cook and Preserve Food With the Power of the Sun
Cooking doesn’t have to depend on electricity or gas. With a DIY solar oven, you can harness the most abundant free energy source—the sun—to prepare meals and preserve food.
Whether you’re making rice, baking bread, or drying apples, a solar oven is practical, sustainable, and empowering. It’s a project that not only saves money but also teaches resilience and self-reliance.
So why not build your own this weekend? With just a box, foil, and sunlight, you can experience the joy of cooking and dehydrating with nature’s cleanest energy source.
✨ Your turn: Have you ever tried solar cooking? Share your experiments in the comments—I’d love to hear how you’re using the sun in your kitchen!
Learning how to cook with the sun is a powerful step toward independence. But true resilience means being ready for anything—whether that’s a storm, a blackout, or a long-term grid failure. That’s why I recommend Dark Reset. It’s a survival blueprint that complements skills like solar cooking, helping you stay prepared, safe, and self-sufficient when modern systems fail.